Adding spawnable characters
XML Tutorial
Extract the BINACJBOCharacter.oni file as xml. For example you want to add Muro to Level 1. Use a GUI or the basic command: OniSplit.exe extract:xml extractdir path_to\level1_Final\BINACJBOCharacter.oni. Next extract the BINACJBOCharacter.oni file from the level that contains Muro, such as level19. In the BINACJBOCharacter.xml file search for Muro and you will get this:
        <Object Id="8733" Type="CHAR">
           <Header>
               <Flags>0</Flags>
               <Position>-112.0837 1486 -2619.775</Position>
               <Rotation>0 171.3265 0</Rotation>
           </Header>
           <OSD>
               <Flags>NotInitiallyPresent Omniscient Boss</Flags>
               <Class>muro_generic</Class>
               <Name>Muro</Name>
               <Weapon />
               <Scripts>
                   <Spawn />
                   <Die>check_death2</Die>
                   <Combat />
                   <Alarm />
                   <Hurt />
                   <Defeated />
                   <OutOfAmmo />
                   <NoPath />
               </Scripts>
               <AdditionalHealth>0</AdditionalHealth>
               <Job>
                   <Type>None</Type>
                   <PatrolPathId>0</PatrolPathId>
               </Job>
               <Behaviors>
                   <CombatId>0</CombatId>
                   <MeleeId>30</MeleeId>
                   <NeutralId>0</NeutralId>
               </Behaviors>
               <Inventory>
                   <Ammo>
                       <Use>1</Use>
                       <Drop>0</Drop>
                   </Ammo>
                   <EnergyCell>
                       <Use>1</Use>
                       <Drop>0</Drop>
                   </EnergyCell>
                   <Hypo>
                       <Use>0</Use>
                       <Drop>0</Drop>
                   </Hypo>
                   <Shield>
                       <Use>0</Use>
                       <Drop>0</Drop>
                   </Shield>
                   <Invisibility>
                       <Use>0</Use>
                       <Drop>0</Drop>
                   </Invisibility>
               </Inventory>
               <Team>Syndicate</Team>
               <InitialAmmo>100</InitialAmmo>
               <Alert>
                   <Initial>Low</Initial>
                   <Minimal>Low</Minimal>
                   <JobStarting>Low</JobStarting>
                   <Investigating>Low</Investigating>
               </Alert>
               <AlarmGroups>0</AlarmGroups>
               <Pursuit>
                   <Strong>4</Strong>
                   <Weak>1</Weak>
                   <StrongSeen>4</StrongSeen>
                   <WeakSeen>4</WeakSeen>
                   <Lost>0</Lost>
               </Pursuit>
           </OSD>
       </Object>
Copy this entire section to the level1's BINACJBOCharacter.xml file. At this point you can either adjust the settings of Muro, or keep it as is. To convert the BINACJBOCharacter.xml file to Oni format use the basic command: OniSplit.exe -create convertdir path_to\BINACJBOCharacter.xml
Hex Editing
You can now add additional characters to any level by simply using a hexeditor.
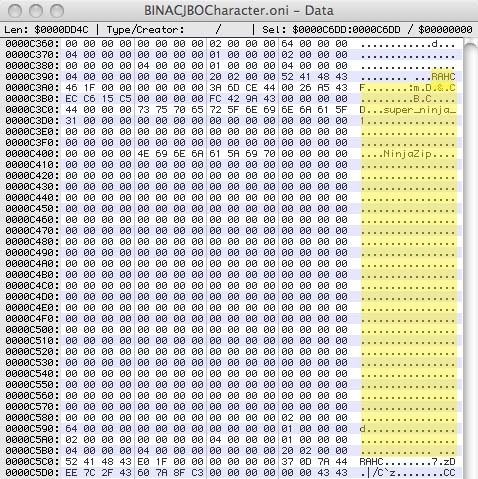
The BINACJBOCharacter.oni file in each level has data for each character in that level. If you look at the file with a hexeditor, you'll see that the info for each character starts with RAHC and it is 0x224 in size (hex) or 548 bytes.
Here is an example:

This is important to know because for each character you add to a level, you have to change 2 other numbers in the file.
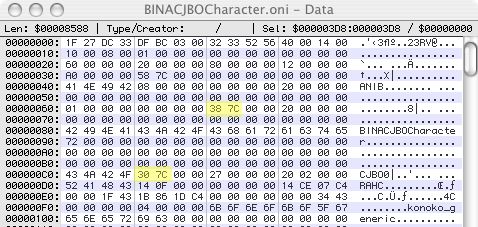
As this screenshot shows:

38 7C is the size of the part in the raw/separate file in bytes (31800)
30 7C is the size of the complete collection from this position in bytes (31792)
To convert to decimal switch the pair of numbers 387C becomes 7C38, then use a hex to decimal converter: https://www.easycalculation.com/hex-converter.php to get the number 31800. The same for the other number.
(Note: These numbers will be different depending on which level you are editing. )
So for example, if you add ten characters to this level, its will increase the size by 5,480 bytes (10 x 548 bytes per character)
The size of the raw will become 37280 (31800+5480) and the collection size will be 37272 (31792+5480)
Now you have to convert those numbers into hex: https://www.easycalculation.com/decimal-converter.php
37280 becomes 91A0 and 37272 becomes 9198. But in Oni, you have to reverse the numbers (its related to endian), so in the file you have to change them to A091 and 9891.
Now one more thing you have to remember:
The last 4 bytes (after the last CHAR entry) used to be 00 00 00 00, indicating the end of the collection. You will have to change them to 20 02 00 00, to indicate you are adding another character. After the first additional charcter you'll have to write 20 02 00 00 to indicate another character will be added. Finally, after your "new last element", be sure to write 00 00 00 00 to signal the end of the collection.
After, you have made the changes, you will need to recompile that level again.
As always Make a backup of the original BINACJBOCharacter.oni file, just in case, you need to start over.
For more information on CHAR, look at this page: OBD:BINA/OBJC/CHAR