XML:TXMB: Difference between revisions
(→Creating a TXMB: rewriting instructions, as dox's link is broken; referenced material to be added shortly) |
m (link fix) |
||
| (3 intermediate revisions by the same user not shown) | |||
| Line 1: | Line 1: | ||
{{XML_File_Header | type=TXMB | {{XML_File_Header | prev=TXCA | type=TXMB | next=TXMP | name=Texture Map Big}} | ||
==General information== | ==General information== | ||
{| border=0 cellspacing=10 cellpadding=0 style="float:right" | {| border=0 cellspacing=10 cellpadding=0 style="float:right; width:22em;" | ||
|valign=top| | |||
<pre>1024x768 made of ... | |||
_00 - 256x256 | |||
_01 - 256x256 | |||
_02 - 256x256 | |||
_03 - 256x256 | |||
_04 - 256x256 | |||
_05 - 256x256 | |||
_06 - 256x256 | |||
_07 - 256x256 | |||
_08 - 256x256 | |||
_09 - 256x256 | |||
_10 - 256x256 | |||
_11 - 256x256 | |||
+-----+-----+-----+-----+ | |||
| _00 | _01 | _02 | _03 | | |||
| | | | | | |||
+-----+-----+-----+-----+ | |||
| _04 | _05 | _06 | _07 | | |||
| | | | | | |||
+-----+-----+-----+-----+ | |||
| _08 | _09 | _10 | _11 | | |||
| | | | | | |||
+-----+-----+-----+-----+</pre> | |||
|} | |||
{| border=0 cellspacing=10 cellpadding=0 style="float:right; width:16em;" | |||
|valign=top| | |valign=top| | ||
<pre>640x480 made of ... | <pre>640x480 made of ... | ||
| Line 13: | Line 41: | ||
_5 - 128x224 | _5 - 128x224 | ||
+-----+-----+ | +-----+-----+--+ | ||
| _0 | _1 |_2 | | | _0 | _1 |_2| | ||
| | | | | | | | | ||
| | | | | | | | | ||
+-----+-----+--+ | |||
| _3 | _4 |_5| | |||
| | | | | |||
+ | +-----+-----+--+</pre> | ||
+-----+ | |||
| _4 | _5 | |||
| | | | |||
+----- | |||
+ | |||
|} | |} | ||
*The XML code on this page is compatible with OniSplit '''v0.9.61.0''' | *The XML code on this page is compatible with OniSplit '''v0.9.61.0'''. | ||
*TXMB files create the '' | *TXMB files create the ''splashscreens'' which we see at the start and end of levels (making three total: the title screen, an endscreen for losing the level, and one for winning). | ||
*A TXMB file simply hold links to TXMPs which are assembled by Oni to display a larger picture than the maximum size of a single texture.<br>The current max resolution for a single TXMP in Windows is 512x512 and on Mac is 1024x1024 as of 2018. | *A TXMB file simply hold links to TXMPs which are assembled by Oni to display a larger picture than the maximum size of a single texture.<br>The current max resolution for a single TXMP in Windows is 512x512 and on Mac is 1024x1024 as of 2018. | ||
*The arrangement of the constituent TXMPs into columns and rows is computed at runtime. Probably the engine stacks TXMPs horizontally until the value in the Width field is reached, and then starts a new row. | *The arrangement of the constituent TXMPs into columns and rows is computed at runtime. Probably the engine stacks TXMPs horizontally until the value in the Width field is reached, and then starts a new row. | ||
| Line 79: | Line 81: | ||
<Texture> | <Texture> | ||
<Flags>DisableUWrap DisableVWrap</Flags> | <Flags>DisableUWrap DisableVWrap</Flags> | ||
[[ | [[XML:TXMP#XML_tags|<Format>]]BGR555</Format> | ||
<Image>TXMPlevel01_win_0.tga</Image> | <Image>TXMPlevel01_win_0.tga</Image> | ||
</Texture> | </Texture> | ||
| Line 86: | Line 88: | ||
==Creating a TXMB== | ==Creating a TXMB== | ||
===Manually=== | ===Manually=== | ||
You can create the TXMB manually by splitting a large image into pieces, converting them to TXMP.oni files with OniSplit, and then referencing them in a TXMB.xml file in the format given under "General information". Note that the intro screen PSDs linked to under " | You can create the TXMB manually by splitting a large image into pieces, converting them to TXMP.oni files with OniSplit, and then referencing them in a TXMB.xml file in the format given under "General information". Note that the intro screen PSDs linked to under "Splashscreen template" have built-in guides for quick slicing of an image (see the read-me in the ZIP). Once you have converted the slices to .oni format and have written the TXMB.xml file, pass it to OniSplit with the "-create" command to get the TXMB.oni file. You now have the TXMB.oni and TXMP.oni files that you need to present a splashscreen in your level. | ||
===Tool-assisted=== | ===Tool-assisted=== | ||
| Line 139: | Line 141: | ||
*The "4" in "tile -4x" is derived from your knowing that this TXMB is 1024x1024 and the TXMPs are 256px wide, therefore the TXMB is made up of 4 columns of TXMPs. | *The "4" in "tile -4x" is derived from your knowing that this TXMB is 1024x1024 and the TXMPs are 256px wide, therefore the TXMB is made up of 4 columns of TXMPs. | ||
== | ==Splashscreen template== | ||
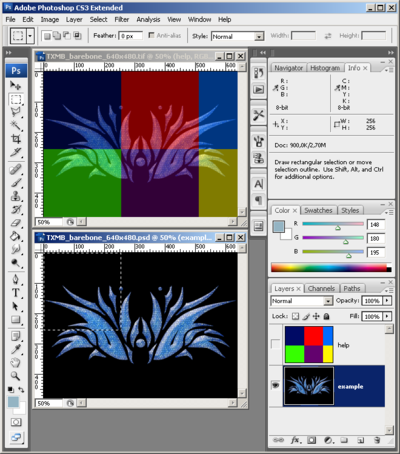
ViciousReilly provided to the community the following Adobe Photoshop templates that allow any modder to create similar splashscreens to the ones found in the original game. '''If you use the templates, please give credit to ViciousReilly for his work!''' | |||
* [http://iritscen.oni2.net/wiki/Intro%20Splash%20Templates.zip Intro screen] | |||
* [http://script10k.oni2.net/wikifiles/ONI_LevelSplash_Template.zip Win / Lose screens] | * [http://script10k.oni2.net/wikifiles/ONI_LevelSplash_Template.zip Win / Lose screens] | ||
The Xenotron font, used by Oni and by us in these templates, can be downloaded from the [[Xenotron]] page. | |||
Samples of splashscreens produced with the above templates (note: final versions of splashscreens in mods may include extra editing not present in the templates): | |||
<gallery widths=512px heights=384px> | |||
File:HD Training intro screen.jpg | |||
File:Omega Tournament lose 1 splash.png | |||
</gallery> | |||
{{XML}} | {{XML}} | ||
Latest revision as of 13:07, 5 April 2021
| TXMB : Texture Map Big | 
| |
|---|---|---|
| XML
TXCA << Other file types >> TXMP |
General information
1024x768 made of ... _00 - 256x256 _01 - 256x256 _02 - 256x256 _03 - 256x256 _04 - 256x256 _05 - 256x256 _06 - 256x256 _07 - 256x256 _08 - 256x256 _09 - 256x256 _10 - 256x256 _11 - 256x256 +-----+-----+-----+-----+ | _00 | _01 | _02 | _03 | | | | | | +-----+-----+-----+-----+ | _04 | _05 | _06 | _07 | | | | | | +-----+-----+-----+-----+ | _08 | _09 | _10 | _11 | | | | | | +-----+-----+-----+-----+ |
640x480 made of ... _0 - 256x256 _1 - 256x256 _2 - 128x256 _3 - 256x224 _4 - 256x224 _5 - 128x224 +-----+-----+--+ | _0 | _1 |_2| | | | | | | | | +-----+-----+--+ | _3 | _4 |_5| | | | | +-----+-----+--+ |
- The XML code on this page is compatible with OniSplit v0.9.61.0.
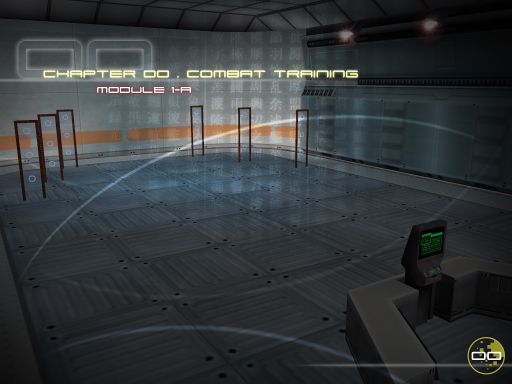
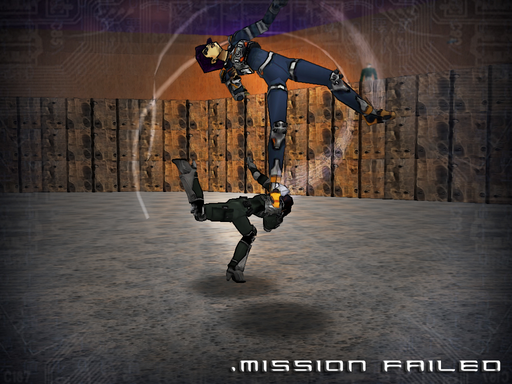
- TXMB files create the splashscreens which we see at the start and end of levels (making three total: the title screen, an endscreen for losing the level, and one for winning).
- A TXMB file simply hold links to TXMPs which are assembled by Oni to display a larger picture than the maximum size of a single texture.
The current max resolution for a single TXMP in Windows is 512x512 and on Mac is 1024x1024 as of 2018. - The arrangement of the constituent TXMPs into columns and rows is computed at runtime. Probably the engine stacks TXMPs horizontally until the value in the Width field is reached, and then starts a new row.
- TXMBs are displayed with the BSL command "splash_screen image_name". They can be called whenever we like; during their display, the game will be paused.
Example TXMB — TXMBwin_splash_screen.xml (from level1_Final/NoGlobal)
<?xml version="1.0" encoding="utf-8"?>
<Oni>
   <TXMB id="0">
       <Width>640</Width>
       <Height>480</Height>
       <Textures>
           <Link>TXMPlevel01_win_0</Link>
           <Link>TXMPlevel01_win_1</Link>
           <Link>TXMPlevel01_win_2</Link>
           <Link>TXMPlevel01_win_3</Link>
           <Link>TXMPlevel01_win_4</Link>
           <Link>TXMPlevel01_win_5</Link>
       </Textures>
   </TXMB>
</Oni>
Example TXMP -- TXMPlevel01_win_0.xml (from level1_Final/NoGlobal)
<?xml version="1.0" encoding="utf-8"?>
<Oni>
   <Texture>
       <Flags>DisableUWrap  DisableVWrap</Flags>
       <Format>BGR555</Format>
       <Image>TXMPlevel01_win_0.tga</Image>
   </Texture>
</Oni>
Creating a TXMB
Manually
You can create the TXMB manually by splitting a large image into pieces, converting them to TXMP.oni files with OniSplit, and then referencing them in a TXMB.xml file in the format given under "General information". Note that the intro screen PSDs linked to under "Splashscreen template" have built-in guides for quick slicing of an image (see the read-me in the ZIP). Once you have converted the slices to .oni format and have written the TXMB.xml file, pass it to OniSplit with the "-create" command to get the TXMB.oni file. You now have the TXMB.oni and TXMP.oni files that you need to present a splashscreen in your level.
Tool-assisted
It's much faster to use Vago to create a TXMB and its constituent TXMPs — see Vago's menu item "Tools>Background Image Wizard".
Algorithm to split an image for TXMB
The following algorithm seems to work correctly in generating a 640x480 TXMB, the size that is used in vanilla Oni. The algorithm is currently used in Vago for TXMB creation. It works as follows:
Try to fit 256x256 images into the TXMB's space until you aren't able to add any more images of that size, then find the remaining width/height left to complete the TXMB. Example:
256x256    | 256x256    | 128x256 *

256x224 ** | 256x224 ** | 128x224* **
*We add an image of 128px width, because anything more would overflow the TXMB's 640px width.
**We add images of 224px height, because 256px height images would have overflowed the TXMB's 480px height.
Algorithm pseudo code:
function getSplitSizes(int sideSize){
   vector splitSizes;
   int remainingSize = sideSize;
   int regularSize = 256;
   while (remainingSize > 0){
      if(remainingSize - regularSize < 0){
         splitSizes.add(remainingSize);
         remainingSize = 0;
      }
      else{
         splitSizes.add(regularSize);
         remainingSize = remainingSize - regularSize;
      }
   }
   return splitSizes;
}
Automatically-loaded TXMBs
There are three TXMBs that Oni automatically loads by name upon specific events:
- TXMBintro_splash_screen
- Savepoint loaded
- TXMBwin_splash_screen
- Level won ("win" BSL function is called)
- TXMBfail_splash_screen
- Level failed ("lose" BSL function is called)
These files are looked for in the specific level's folder. If they are not provided, the engine simply skips them.
Reassembling a TXMP
OniSplit does not offer to extract TXMBs to a single composite image made up of the individual TXMPs. It will only extract to XML a list of the TXMP names. If you have ImageMagick installed, use this command on the TXMPs to reassemble them into one large image:
montage -mode concatenate -tile 4x TXMPlevelXX_fail_*.png TXMPlevelXX_fail.png
- The images of course need to be passed to IM in the correct order; the numerical order determined by their names will work, but only if they are named with two-digit padding (TXMPlevelXX_fail_00.png, …_01.png, etc.). Otherwise, TXMPlevelXX_fail_10.png would come right after …fail_1.png and before …fail_2.png.
- The "4" in "tile -4x" is derived from your knowing that this TXMB is 1024x1024 and the TXMPs are 256px wide, therefore the TXMB is made up of 4 columns of TXMPs.
Splashscreen template
ViciousReilly provided to the community the following Adobe Photoshop templates that allow any modder to create similar splashscreens to the ones found in the original game. If you use the templates, please give credit to ViciousReilly for his work!
The Xenotron font, used by Oni and by us in these templates, can be downloaded from the Xenotron page.
Samples of splashscreens produced with the above templates (note: final versions of splashscreens in mods may include extra editing not present in the templates):


