Blender: Difference between revisions
(→Tutorials: Added Wolf's 45-minute Blender Crash Course) |
|||
| Line 86: | Line 86: | ||
==Oni Animation Rig for Blender== | ==Oni Animation Rig for Blender== | ||
Currently we have a rig available in the form of a [http://mods.oni2.net/node/388 Blender scene available here.] The rig was made by Geyser and Delano762, and | Currently we have a rig available in the form of a [http://mods.oni2.net/node/388 Blender scene available here.] The rig was made by Geyser and Delano762, and a '''loose''' tutorial on how to use it is available [http://oni.bungie.org/forum/viewtopic.php?id=3245 here.] The rig is based off the Rigify plugin for Blender. | ||
Rig's capabilities include: | Rig's capabilities include: | ||
Revision as of 14:06, 6 September 2021

|
This page is unfinished. Can you fill in any missing information? |

|
This page contains information that is out of date. |
|
|
There's also some information HERE, but it's really ancient — like, v2.46 ancient. |
Controls
Blender is so radically different from any other tool that you might want to customize the controls. In that case, have a look at:
- File > User Preferences... > Input > 3D View > 3D View (Global)
The more controls you change, the harder it gets to follow a tutorial. Consider biting the bullet and keeping the controls as they are.
Viewport
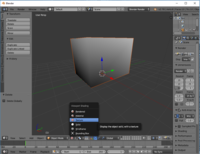
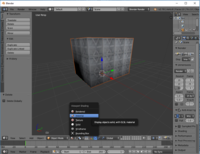
Q: How can I change the display mode to see textures?
- A: At the bottom, click at the circle button to get a dropdown menu.
- Texture gives you just rough shading.
- Use Material instead to see textures plus rough shading.
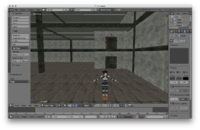
Q: How do I get global lighting?
- A: Go to the World properties and select the box Environment Lighting. (See the Warehouse screenshot)
Object mode with vertex colors
- In the upper right are small "sphere" buttons and an arrow.
- When "solid" is selected, click on the arrow to open a drop down menu and change the color to vertex.
UI
Q: How do I close panels?
Tools and actions
Blender has excellent documentation. See HERE for the general docs on face-editing.
Q: How do I select faces, edges and vertices (points)?
- A: There are controls at the bottom of the viewport. While being in Edit Mode, make the Edge symbol active. Right-click a component to select it. Use Shift to add or subtract.
Q: How do I toggle between selection modes.
- A: See here.
Q: How do I (de)select all?
- A: Press A.
Q: How do I fill holes in meshes?
- A: Select edges of the hole. Press F to make a N-gon face or press F + Alt to make a triangulated face.
Q: How do I show normals?
- A: Press N to toggle for a panel with more properties. Scroll down to Mesh Display section. You likely want to click the faces symbol.
- Remove hard (blue) edge
- In edit mode select edge, go to the right, open "Shading / UVs"
- Edges: "Smooth" button
- Triangulate faces
- Select faces, Control + T
- Quadrulate triangles
- Select faces, Alt + J
Q: How do I edit UVs?
- A:
Hotkeys
Right-click a menu for the context menu. Often this allows you to assign a hotkey.
Development
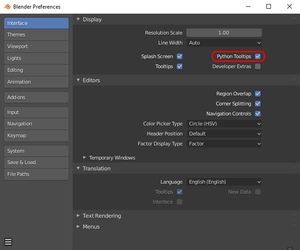
You may want to go to the preferences and switch on Python Tooltips.
Contrary to intuition, the Developer Extras do not give you additional Python functionality per se. Instead this option enables experimental Blender features.
Related videos:
- Python Crash Course for Blender! - Curtis Holt
- Blender 2.8 Addon Development Tutorial for Beginners - Jayanam
Tutorials
General Blender basics:
- Wolf's 45-Minute Crash Course for Blender Virgins (yes, seriously - this is one of the best Blender basics tutorials out there, it's particularly good if you know your basics already and you want to find out if you've missed anything)
Modelling
Rigging
Oni Animation Rig for Blender
Currently we have a rig available in the form of a Blender scene available here. The rig was made by Geyser and Delano762, and a loose tutorial on how to use it is available here. The rig is based off the Rigify plugin for Blender.
Rig's capabilities include:
- Snapping to Oni animations through rig's bone constraints controlled by the Z-location of the objects in the Pose Matching layer (added feature in comparison to the rest which come with Rigify by default),
- Inverse and Forward Kinematics (IK and FK),
- Snapping between IK and FK chains,
- Function to snap IK hand controller rotation to the wrist bone, integrated into rig_ui.py (added feature),
- IK joint poles for specifying limb joints (elbows and knees) should be facing,
- Sliders specifying how much should neck, head and FK limbs retain their World space rotation instead - that is Neck Follow, Head Follow and FK Limb Follow,
- IK Foot pivoting controllers around toes and the heel,
- Root bone,
- Rig has some scripts available for it listed below.
Tutorial for creating Oni Animation Rig for Blender from scratch
If you want to create the above rig, and learn a bit about rigs, IK/FK, Rigify, Blender, its bone layers, bone constraints, scripts, issues with Oni models and animations like rotation order incompatible with Blender and whatnot, an article detailing how to create this rig from scratch will be soon available here.
Scripts
Script for enabling/disabling constraints in selected objects
This script allows the user to enable or disable constraints in currently selected objects, depending on whether con.mute is set to 0 (enable constraints) or 1 (disable). Usage is simple, just select your objects, set the value of con.mute and run the script.
import bpy
obj = bpy.context.selected_pose_bones_from_active_object
for bone in obj:
    for con in bone.constraints:
        con.mute = 1
Blender forward throw adjustment script
Please see the XML:TRAM page describing this script.
Rig bone constraint target setting script
This script sets the targets of Geyser's rig bone constraints, after removing one of the existing pose-matching characters and replacing it with another.
import bpy
obj = bpy.data.objects

#SET THIS TO EITHER 1 OR 2 DEPENDING ON WHICH POSE YOU ARE GOING TO USE
prefix='1'

armature = bpy.data.objects['rig']

#copying location
armature.pose.bones["torso"].constraints['Copy Location.00'+prefix].target=obj['mid.00'+prefix]
armature.pose.bones["torso_pivot"].constraints['Copy Location.00'+prefix].target=obj['pelvis.00'+prefix]

#copying rotation
#Torso
armature.pose.bones["hips"].constraints['Copy Rotation.00'+prefix].target=obj['pelvis.00'+prefix]
armature.pose.bones["tweak_spine.001"].constraints['Copy Rotation.00'+prefix].target=obj['mid.00'+prefix]
armature.pose.bones["chest"].constraints['Copy Rotation.00'+prefix].target=obj['chest.00'+prefix]
armature.pose.bones["shoulder.R"].constraints['Copy Rotation.00'+prefix].target=obj['right_shoulder.00'+prefix]
armature.pose.bones["shoulder.L"].constraints['Copy Rotation.00'+prefix].target=obj['left_shoulder.00'+prefix]
armature.pose.bones["neck"].constraints['Copy Rotation.00'+prefix].target=obj['neck.00'+prefix]
armature.pose.bones["head"].constraints['Copy Rotation.00'+prefix].target=obj['head.00'+prefix]

#Arms
armature.pose.bones["upper_arm_fk.L"].constraints['Copy Rotation.00'+prefix].target=obj['left_biceps.00'+prefix]
armature.pose.bones["upper_arm_fk.R"].constraints['Copy Rotation.00'+prefix].target=obj['right_biceps.00'+prefix]
armature.pose.bones["forearm_fk.L"].constraints['Copy Rotation.00'+prefix].target=obj['left_wrist.00'+prefix]
armature.pose.bones["forearm_fk.R"].constraints['Copy Rotation.00'+prefix].target=obj['right_wrist.00'+prefix]
armature.pose.bones["hand_fk.L"].constraints['Copy Rotation.00'+prefix].target=obj['left_handfist.00'+prefix]
armature.pose.bones["hand_fk.R"].constraints['Copy Rotation.00'+prefix].target=obj['right_handfist.00'+prefix]

#Legs
armature.pose.bones["thigh_fk.L"].constraints['Copy Rotation.00'+prefix].target=obj['left_thigh.00'+prefix]
armature.pose.bones["thigh_fk.R"].constraints['Copy Rotation.00'+prefix].target=obj['right_thigh.00'+prefix]
armature.pose.bones["shin_fk.L"].constraints['Copy Rotation.00'+prefix].target=obj['left_calf.00'+prefix]
armature.pose.bones["shin_fk.R"].constraints['Copy Rotation.00'+prefix].target=obj['right_calf.00'+prefix]
armature.pose.bones["foot_fk.L"].constraints['Copy Rotation.00'+prefix].target=obj['left_foot.00'+prefix]
armature.pose.bones["foot_fk.R"].constraints['Copy Rotation.00'+prefix].target=obj['right_foot.00'+prefix]
Visual transformer script
This script "bakes" the animation done using Geyser's rig into Oni character model bones by applying visual transform and keyframing each frame within a specified frame range.
import bpy

start = 0
end = 100

scene = bpy.context.scene

scene.frame_set(start) #set start frame
for i in range(start, end): #loop for every frame
        scene.frame_set(i)
        bpy.ops.object.visual_transform_apply()
        bpy.ops.anim.keyframe_insert_menu(type='BUILTIN_KSI_LocRot')


