Creating an animation rig in Blender: Difference between revisions
(Added the "Editing the bone constrants" header) |
|||
| Line 404: | Line 404: | ||
Now's the time to edit and add bone constraints | Now's the time to edit and add bone constraints | ||
#<li value="52">Switch to Pose mode and select the ORG layer.</li> | #<li value="52">Switch to Pose mode and select the ORG layer.</li> | ||
# Add bone constraints in accordance to the table below. | |||
{| class="wikitable" | |||
|- | |||
! Bone !! Bone Constraint !! Target !! Target/Bone | |||
|- | |||
| ORG-spine || Copy Transforms || rig || MCH-WGT-hips | |||
|- | |||
| ORG-spine.001 || Copy Rotation || rig || tweak_spine.001 | |||
|- | |||
| ORG-spine.002 || Copy Transforms || rig || MCH-WGT-chest | |||
|} | |||
#<li value="53">Delete the ''Stretch to'' bone constraint from ''ORG-spine.003''.</li> | |||
#Set the ''Bone'' in the ''Copy Transforms'' bone constraint in ''ORG-spine.003'' to ''neck''. | |||
[[Category:Modding tutorials]] | [[Category:Modding tutorials]] | ||
Revision as of 21:17, 11 September 2021
Introduction
This tutorial shows you how to create the animation rig for Blender (made by geyser), with some improvements.
The purpose of this rig is to give us much better tools to animate, compared to our previous process in Softimage XSI by EdT, which allowed us to animate exclusively with Forward Kinematics. While FK may work for simple, short animations done on characters with a small amount of bones, it does not work well for Oni characters and animations, as it's too labor-intensive and inefficient.
Prerequisite tutorials
I highly recommend watching the tutorials below if you feel you're lacking knowledge in any of these subjects:
General Blender basics:
Blender Character Rigging overview showing that you can create a Rigify rig in less than a minute at 5:43, and also rig a character while at it:
Basics of using Rigify:
Rigify Bone Groups and Layers:
- Rigify Tutorial 7-1: Rigify Bone Groups and Layers (Overview) by CGDive
- Rigify Tutorial 7-2: Rigify Bone Groups and Layers (Practice) by CGDive
- Rigify Tutorial 7-3: Rigify Bone Groups and Layers (Advanced) by CGDive
Changing Rigify Custom Shapes and Widgets:
- Rigify - Custom Shapes/Widgets by CGDive
Blender custom properties and drivers (drivers in the rig described here are used to set the influence of its controllers' bone constraints through the Pose1 and Pose2 bone locations):
- Custom properties and drivers in blender made easy by Pierrick Picaut
Tracking constraint tutorials
These explain constraints like Damped Track which are used by Rigify – you can skip this if you want, but it might give you a better idea of how Rigify's MCH (Mechanical) layers work, or come in handy in the distant future; other than that, you don't need to know them to animate for Oni:
- Tracking Constraints - Blender 2.80 Fundamentals
- Camera Track To vs Damped Track Constraints | Pros & Cons Explained With Examples | Blender by 5 minutes Blender
Things to know before starting
There are several things worth knowing before you start creating the rig.
Tools and relevant tutorials
- Current version of OniSplit. This is the tool needed to import and export assets out of Oni. DO NOT USE OniSplit GUI or Vago for importing Oni assets into Blender - neither of these weren't updated in a long time, and thus they don't support OniSplit's v0.9.99.2 -blender option. You can still use them for other purposes though, such as sounds and converting .oni files to XMLs, etc.
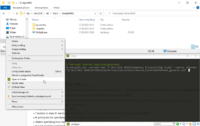
- Cmder (Windows only) - because OniSplit is a command line tool, it is highly recommended to get any upgrade to Windows' Command Prompt. As shown in the screenshot on the right, Cmder allows you to start it from the context menu in any selected folder, and it also remembers your most recently used commands, vastly improving your workflow when you're forced to use any command line tools.
- Rigify - it's a plugin for Blender designed to automate a lot of rigging work. The rig described here is generated using Rigify.
- Oni-Blender tutorial by EdT. Please read this in entirety to know likely-to-happen issues and refer to this as your guide for OniSplit commands relating to Blender.
- Brief overview on creating TRAMs by EdT - while this was written with XSI in mind, this is still relevant as the process for preparing the XML files for Oni is still the same. Also the next post in that thread, called Brief walk through on modifying a TRAM, is an example of that overview put into practice.
Rotation order issue between Oni and Blender
Broken alpha transparency and textures on animated models
Importing animations and preparing the Blender scene
The actual tutorial starts here.
For detailed explanation of the required OniSplit commands, please refer to the Oni-Blender Tutorial by EdT listed in the Tools and relevant tutorials.
- Using OniSplit, export any character you want as a DAE (-extract:dae) using -noanim and -blender arguments.
- As per EdT's Oni-Blender Tutorial, you should get AnimationDaeWriter: custom axis conversion in OniSplit output if you've used the -blender argument. If you didn't get that on the output, it means something most likely went wrong and you won't be able to import the model into Blender (or you will be able to import it but it will be wrong).
- Assuming you wanted a textured model and thus you've exported an ONCC, you should now get a DAE file and an images folder containing the textures for it.
- Using OniSplit, export any two animations as an XML (-extract:xml) using -noanim (T-Pose), -anim-body (lets you specify the character you want) and -blender arguments.
- You should get one DAE and an XML file for each animation, totalling four files.
- Open up Blender and set your scene's frame rate to 60 FPS. If you don't, the keyframes of the imported animations will get tightened up together, because Blender's default scene framerate is 24 FPS.
- Import the -noanim model into Blender first (MAKE SURE YOU CHECK THE Import Unit BOX, otherwise you will import the model with arbitrary units which will break everything and will be basically unadjustable later)
- Import the animations into Blender (ALSO MAKE SURE YOU CHECK THE Import Unit BOX EACH TIME)
- At this point the -noanim/T-posed model in the scene should have no suffix in its body part names, while the animated models should have .001 and .002 suffixes. This is intended; the T-posed model will serve for building the metarig and editing the rig once it's generated, while the animated models are needed for pose matching purposes, where the suffixes are useful for setting up the bone constraints.
- Create three new collections in the Outliner, name them T-pose, Pose 1 and Pose 2. These three collections allow you to quickly hide the respective models from the Viewport using the eye icon in the Outliner.
- Move the T-Posed model to T-pose, and move .001 and .002 animated models to Pose 1 and Pose 2 collections respectively.
- If you've imported the textured model, apply textures to the animated models and fix the alpha transparency issue.
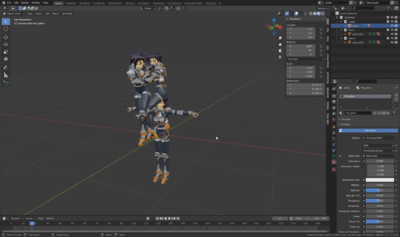
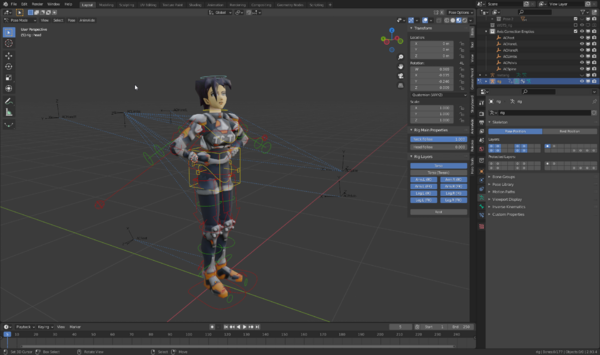
- At this point, your scene should look as shown in the screenshot on the right.
- You can hide the Pose 1 and Pose 2 collections - they won't be needed until later in the tutorial.
Adjusting T-posed model's Z location
At this moment the T-posed model is sunk to the ground. That's because the pelvis location is set to 0,0,0. All of the animations in Oni have their heights adjusted (through the <Height> tags) so that the pelvis is roughly at Z ~ 0.9, so that the characters appear standing on the floor instead of, again, sinking into it. For this reason, we want to adjust the position of the pelvis so that the feet soles are aligned with the floor.
- Adjust the Z position of the T-posed model's Pelvis in one of the two ways:
- Simply switch to Front Ortographic view (Num 1) and move the Pelvis along the Z axis so that the feet soles are roughly aligned with the floor. This will work, but if you want 100% accuracy, use the method below.
- The 3D Cursor method:
- Select one of the feet in Object mode.
- Switch to Edit mode.
- Select one of the lowest-reaching vertices on the foot and Snap Cursor to Active. (Shift + S, 3)
- Switch back to object mode.
- Select the Pelvis.
- Snap Selection to Cursor. (Shift+S, 8)
- Set the X and Y locations of the pelvis to 0.
- Invert the Z location of the pelvis.
- The pelvis should be now at Z ~ 0.9 with feet soles perfectly aligned with the floor.
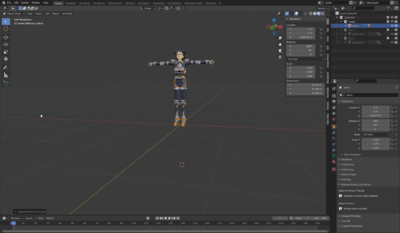
- At this point, your scene should look as shown in the screenshot on the right.
Creating the Rigify metarig and adding limb flexion
This part describes how to create a Rigify metarig and how to adjust it so that it matches the T-posed model body parts.
- Before you proceed to create the rig, you need to add small rotations to the limbs, which will allow Rigify to know in which direction the elbows and knees are going to bend. Otherwise, the rig will not function properly.
- Add the following Z rotations to the respective body parts in accordance with the list below:
| Z rotation | Bones |
|---|---|
| -5 |
|
| -10 |
|
| 5 |
|
- Enable Rigify in Blender if you haven't already - you can do that by going to Edit / Preferences / Addons and looking it up, as Rigify comes with by Blender by default.
- Add a Basic Human Metarig to the scene. ( Add Menu / Armature / Basic / Basic Human (Meta-Rig) )
- Scale the rig by 10 or so that it's roughly the size of the character.
- Apply the scale. ( Object / Apply / Scale )
- Go to Metarig's Object Data Properties tab and:
- Open Viewport Display,
- Check "In Front" box to make the metarig easier to select when your Viewport is in Solid or Material Preview shading modes,
- Check the Axes box to see the local axes of each bones - this makes their rolls easier to understand.
- Remove the following bones from the Metarig:
- pelvis.L
- pelvis.R
- breast.L
- breast.R
- spine.005
- spine.006
- Go to Edit mode, select Bone Properties tab and change the Connected box of the following Metarig's bones accordingly to the below table:
| Bone | Connected |
|---|---|
| spine.003 | Disable |
| spine.004 | Enable |
| shoulder.l | Enable |
| shoulder.r | Enable |
- The default Rigify bone layer order is highly unergonomic. For this reason, reassign the following bones to bone layers in accordance with the table below. You can reassign bones' bone layers by selecting them and pressing M. Make sure you have enabled User Tooltips in Preferences / Interface - that way when you move your cursor over the layer box, a tooltip will display the layer number.
| Bones | Bone layer |
|---|---|
|
8 |
|
0 |
|
16 |
|
4 |
|
20 |
- Go to Pose mode, select Bone Properties tab and open the Rigify Type box.
- Set Limb Segments and B-Bone Segments to 1 on the bones listed below. Because Oni uses rigid body parts, Limb Segments and Bendy bones are not needed.
- upper_arm.L
- upper_arm.R
- thigh.L
- thigh.R
- Disable Assign Tweak Layers checkbox on the bones listed below.
- upper_arm.L
- upper_arm.R
- thigh.L
- thigh.R
- spine
- Remove rig type on the spine.004 bone.
- Set rig type on spine.003 bone to spines.super_head.
- Enable the Connect chain checkbox on the spine.003 bone.
- Disable the Widget checkbox on shoulder.L and shoulder.R bones.
- Set pivot_position on the spine bone to 1.
- Enable the Custom Pivot Control checkbox on the spine bone.
- Assign Tweak Layer of spine.003 to 9.
- Assign FK layers for the following bones in accordance with the table below:
| Bones | Bone layer |
|---|---|
|
9 |
| upper_arm.L | 1 |
| upper_arm.R | 17 |
| thigh.L | 5 |
| thigh.R | 21 |
- Now you need to adjust metarig's bones so that they match up with character body parts. In order to reduce the amount of needed work, switch to Edit Mode and check the X-Axis Mirror either in Options or the Tool tab.
- Switch to Object mode and using the Snapping Cursor to Active, and Snapping Selection to Cursor in the Snap menu (Shift + S), keep snapping cursor to model's body parts, selecting the Metarig, switching to Edit mode, selecting the appropriate bone and snapping it to 3D Cursor. I believe it is intuitive which bones should be snapped to which body parts, therefore there is no need for a table describing that, with the exception of hints on what should be done about spine.004, hand.L, hand.R, toe.L, toe.R, heel.02.L and heel.02.R.
- There is actually nothing you need to do about the heel bones, leave them as they are.
- Snap the tails of spine.004, hand.L and hand.R to their heads and move them along the axis they're pointing at, to some whatever point that makes sense to you, e.g. furthest reaching vertex on the hand. No need to be precise here, and thus snapping - just move the tail so that it is roughly where you want it to be.
- In order to keep the toe bones aligned and properly positioned, do the following for each toe bone:
- Select the foot in object mode,
- Snap cursor to the furthest and lowest reaching vertex on the foot,
- Copy the X location of that vertex,
- Snap the bone to cursor,
- Paste the X location to the bone's head,
- Snap bone's tail to the head,
- Move the head along the Y axis by some amount will make it easy to select but not too big.
- In edit mode, set the following rolls for the Metarig bones as described below (if you don't, body parts, mainly shoulders, will get badly rotated after constraining them to the rig after its generation):
- shoulder.L, 90 degrees,
- shoulder.R, -90 degrees,
- All other bones, 0 degrees.
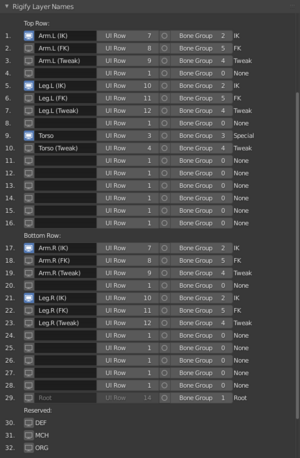
- Now we have to set up how our Rigify rig layers will be named and set up. Go to the Object Data Properties tab, open up Rigify Layer Names, and set the table according to the screenshot below, marked as Point 32.
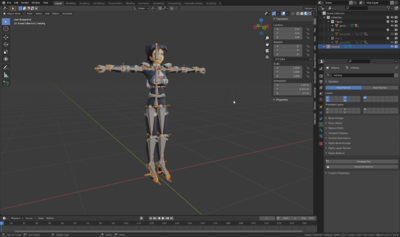
- The metarig is now correctly adjusted. Your scene should look as shown in the screenshot below, marked as Point 33.
- We highly recommend to save your project here and to continue your work in a new file (i.e. save, then save as a new file and continue your work on the new file), so that you can revert to the version you had until now and adjust the Metarig if needed. You can skip this, work on a single file, adjust the metarig, delete your current rig and generate a new one, but it may or may not be less convenient to rename.
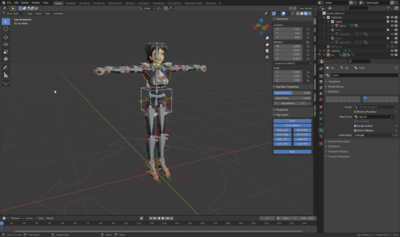
- Generate the rig. Congratulations, you have generated the rig and can move to constraining the character to it. Your scene should look as shown in the screenshot below, marked as Point 35.
 |
 |
|
| Point 32, Rigify layer names for the rig | Point 33, fully adjusted Metarig. | Point 35, generated rig. |
|---|
Constraining the character to the rig and adding the Axis Correction Empties
Now we get to constrain the character to the rig and later edit the rig. Unfortunately, there's even more work in editing the rig than with the metarig.
- Hide the metarig, it won't be needed anymore.
- On the Pelvis of the T-posed character, add two Copy Rotation object constraints with the settings according to the table below. "x" means there's nothing set.
| Setting | Copy Rotation | Copy Rotation.001 |
|---|---|---|
| Target | rig | x |
| Order | ZYX Euler | Default |
| Mix | Replace | After Original |
- Copy the constraints to all of the remaining body parts.
- At this point, the character is folded into Oni's default pose, described [Importing_character_models#Oni.27s_default_orientation HERE.] This is hard to work with, so disable all of the object constraints with the ObjectConstraintEnabler script available [Blender#Script_for_enabling.2Fdisabling_constraints_in_selected_objects HERE.] We will also fix the folded pose in a moment.
- Add a Copy Location constraint to the Pelvis and:
- Set the Target to rig,
- Set the Bone to ORG-spine.
- Now we need to fix the folded pose. This is done through a set of Empties with specified rotations, which are added to the rotation of each body part through the Copy Rotation.001 constraint (this is also why the Mix of that constraint was set to After Original).
- Create a new collection in the Outliner called "Axis Correction Empties".
- Add six Arrows Empties, all with their Name showing in the Viewport Display. ( Object Properties / Viewport Display / Name )
- Name the empties and place them in the proposed arbitrary postions using cursor snapping, and set their rotations according to the table below - you can place them however you want, as their location does not influence the rig in any way, however, proper placement makes them easy to edit if needed. It's also proposed to place the empties one meter either in front or behind the given body part.
| Empty | Body Part | In front of or behind? | X rotation | Y rotation | Z rotation |
|---|---|---|---|---|---|
| ACFeet | Either foot | Behind | -90 | -52.5 | 90 |
| ACHandL | left_handfist | Behind | 180 | 0 | 90 |
| ACHandR | right_handfist | Behind | 0 | 0 | 90 |
| ACLimbs | neck | Behind | -90 | 0 | 90 |
| ACPelvis | pelvis | Front | 90 | 8.6 | 90 |
| ACSpine | mid | Front | 90 | 0 | 90 |
- In your Viewport, open the Viewport Overlay and enable Relationship Lines. These are the lines that will show you lines from constrained objects to their targets. They will give you a better sense of how body parts are copying rotations from the Empties you are about to make. You can also turn Relationship Lines off at any point if they're making the scene hard to read.
- Set the Bones of Copy Rotation and Targets of Copy Rotation.001 constraints in character's body parts in accordance with the table below. The table may be intimidating, but it should be logical enough and easy to copy and paste the targets and bones - all of the body parts get targeted to a corresponding ORG bone in the rig through Copy Rotation and get their Axis Correction rotation added through Copy Rotation.001 set to appropriate empty.
| Body part | Copy Rotation / Bone | Copy Rotation.001 / Target |
|---|---|---|
| pelvis | ORG-spine | ACPelvis |
| mid | ORG-spine.001 | ACSpine |
| chest | ORG-spine.002 | ACSpine |
| neck | ORG-spine.003 | ACSpine |
| head | ORG-spine.004 | ACSpine |
| right_shoulder | ORG-shoulder.R | ACLimbs |
| right_biceps | ORG-upper_arm.R | ACLimbs |
| right_wrist | ORG-forearm.R | ACLimbs |
| right_handfist | ORG-hand.R | ACHandR |
| left_shoulder | ORG-shoulder.L | ACLimbs |
| left_biceps | ORG-upper_arm.L | ACLimbs |
| left_wrist | ORG-forearm.L | ACLimbs |
| left_handfist | ORG-hand.L | ACHandL |
| right_thigh | ORG-thigh.R | ACLimbs |
| right_calf | ORG-shin.R | ACLimbs |
| right_foot | ORG-foot.R | ACFeet |
| left_thigh | ORG-thigh.L | ACLimbs |
| left_calf | ORG-shin.L | ACLimbs |
| left_foot | ORG-foot.L | ACFeet |
- Enable the object constraints in the character body parts using the ObjectConstraintEnabler script.
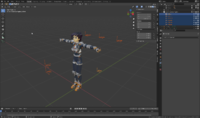
- At this point, you should be able to pose the character, as shown in the screenshot on the right.
Removing and editing the rig bones
There are still things to do; if you play around posing your character, you will find out the spine behaviour to be somewhat lackluster, and lacking control over the mid and chest bones. This will now be addressed, and later, bone constraints need to be added to rig controller bones. Let's start off with deleting all the controller bones we don't need.
- Select the rig, go to Object Data Properties, Viewport Display and enable In Front. The rig will now always render in front of the character, making it easier to select.
- In Edit mode, go to Object Data Properties tab / Skeleton, select Layer 29 (the DEF/Deform) and delete all bones in it.
- Select layer 28, and move the root bone to layer 24 (Change Bone Layer, default shortcut is M)
- Remove the bones listed below from the rig. Keep in mind you can have one layer enabled at a time for your convenience. For the record, we will not be editing MCH or ORG layers until later, so you can ignore their layers for now. IMPORTANT NOTE: Be sure to not delete tweak_spine.001 accidentally, as it's necessary for the rig to function properly.
| Bone | Layer |
|---|---|
| tweak_spine | Torso |
| tweak_spine.002 | Torso |
| tweak_spine.003 | Torso (Tweak) |
| spine_fk.001 | Torso (Tweak) |
| spine_fk.002 | Torso (Tweak) |
| upper_arm_tweak.L | Arm.L (IK) |
| forearm_tweak.L | Arm.L (IK) |
| hand_tweak.L | Arm.L (IK) |
| upper_arm_tweak.R | Arm.R (IK) |
| forearm_tweak.R | Arm.R (IK) |
| hand_tweak.R | Arm.R (IK) |
| thigh_tweak.L | Leg.L (IK) |
| shin_tweak.L | Leg.L (IK) |
| foot_tweak.L | Leg.L (IK) |
| thigh_tweak.R | Leg.R (IK) |
| shin_tweak.R | Leg.R (IK) |
| foot_tweak.R | Leg.R (IK) |
- Using 3D Cursor snapping, snap torso and torso_pivot bones to the mid body part.
- Since torso and torso_pivot are of the same size, etc. and thus are overlapping each other, feel free to move their tails a bit in the appropriate axis. This applies to all overlapping bones in the rig - if they overlap, move the tail in the axis parallel to the bone.
- Reparent shoulder.L and shoulder.R bones from ORG-spine.003 to ORG-spine.002.
- Controller bones are now adjusted, and we can move on to ORG and MCH layers. Select the ORG layer (31), reparent the bones and set their Connected box according to the table below. ' means no change is needed.
| Bone | Parent | Connected |
|---|---|---|
| ORG-spine | root | x |
| ORG-spine.001 | ORG-spine | Yes |
| ORG-spine.002 | ORG-spine.001 | Yes |
| ORG-shoulder.L | ORG-spine.002 | x |
| ORG-shoulder.R | ORG-spine.002 | x |
| ORG-upper_arm.L | x | No |
| ORG-upper_arm.R | x | No |
- Select the MCH layer (3) and remove the following bones:
- MCH-thigh_tweak.L
- MCH-thigh_tweak.R
- MCH-shin_tweak.L
- MCH-shin_tweak.R
- Snap MCH-torso.parent and MCH-torso_pivot to the mid body part. (You can also snap them to MCH-spine or MCH-spine.001 bones as they're snapped to mid as well)
Editing the bone constrants
Now's the time to edit and add bone constraints
- Switch to Pose mode and select the ORG layer.
- Add bone constraints in accordance to the table below.
| Bone | Bone Constraint | Target | Target/Bone |
|---|---|---|---|
| ORG-spine | Copy Transforms | rig | MCH-WGT-hips |
| ORG-spine.001 | Copy Rotation | rig | tweak_spine.001 |
| ORG-spine.002 | Copy Transforms | rig | MCH-WGT-chest |
- Delete the Stretch to bone constraint from ORG-spine.003.
- Set the Bone in the Copy Transforms bone constraint in ORG-spine.003 to neck.
