BlenderOni
BlenderOni is a Blender add-on intended as an integral companion tool for the Animation rig for Blender. It contains functionalities that automate a lot of operations necessary for the rig to function and be used properly. However, the vast majority of the add-on's options can also be used for general Blender tasks.
BlenderOni can be downloaded HERE.
History
When the Rigify-Oni rig was first released to the public, it was meant to be used together with a number of scripts stored within the Blender scene containing the rig. However, those scripts were not ideal - they were awkward to use as setting up the appropriate values was possible only by changing the script code.
Those scripts have become obsolete with the introduction of BlenderOni, which is essentially little more than those scripts wrapped into a GUI. The scripts are nonetheless archived HERE for legacy purposes.
Tutorial video
BlenderOni has its own tutorial video, with the Options explained in Part 2, and Use cases explained in Part 3.
The video can be accessed HERE.
Use cases
Since BlenderOni is a companion tool for the Rigify-Oni rig, explanation of its intended usage is in the rig documentation, available HERE.
Options
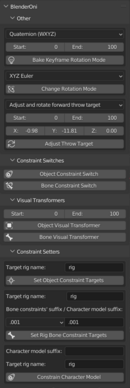
Bake Keyframe Rotation Mode
Keyframes the rotation data in the selected rotation mode for every selected object, for every frame in the specified frame range. Usually used for converting rotation data from Euler angles to Quaternions if needed. Use in Object Mode.
Change Rotation Mode
Changes the rotation mode of every selected object to the selected rotation mode. Use in Object Mode.
Adjust Throw Target
Moves the selected object by the specified offset for every frame in the specified frame range. If the "Adjust and rotate throw target" operation is selected, the object will also get rotated by 180 degrees in the frame range. If the "Adjust back throw target" operation is selected and the object's location is not { X , Y } = { 0 , 0 }, it gets moved to { X , Y } = { 0 , 0 }.
Used for adjusting the position of the throw target animation, both for forward (Adjust and rotate throw target) and back (Adjust back throw target) throws. Use in Object Mode.
If you are importing an animation from Oni, the X, Y and Z fields are supposed to be taken from the <Position> tag. The position tag has the following order:
<Position>x y z</Position>
BlenderOni takes them in a different order due to differences in axis orientation:
X: x, Y: -z, Z: -y
So given the following <Position> tag with the following example values:
<Position>1 2 -3</Position>
The arguments in BlenderOni should be as follows:
X: 1, Y: 3, Z: -2
If you have created a new animation and want to adjust it back to { X , Y } = { 0 , 0 }, then the X and Y arguments will be the inversions of the X and Y location coordinates of the throw target's pelvis in the first frame of the animation. Z should be set to 0. The new resulting <Position> tag should be created using the order schematic above, with the exception of the height (Blender Z, <Position> y) - this value is mostly taken from other TRAMs and adjusted in a trial-and-error manner until the animation looks okay on most characters.
This is because the height adjustment is one and the same for every character type, regardless of their height - so if you pick the right height, smaller characters will float off the ground and the tallest ones will sink into it, while average height characters should have their feet on the ground.
Object Constraint Switch
Switches object constraints on and off within selected objects. Used to constrain and unconstrain character model objects to the rig. Use in Object Mode.
Bone Constraint Switch
Switches bone constraints on and off within selected armature bones. Used to constrain and unconstrain rig to character model objects. Use in Pose Mode.
Object Visual Transformer
Applies visual transform and keyframes rotation and location data for every selected object in the specified frame range. Used as a way to copy animation data from the rig to the character models. Use in Object Mode.
Bone Visual Transformer
Applies visual transform and keyframes rotation and location data for every selected bone of the armature in the specified frame range. Used as a way to copy animation data from character models to the rig. Use in Pose Mode.
Set Object Constraint Targets
Sets the targets of all of the constraints named "Copy Rotation", and also "Copy Location" in case of pelvis, to the specified object. Used to constrain the selected character model to the specified rig. Use in Object Mode.
Set Rig Bone Constraint Targets
In the specified rig, sets the target names of predefined bone constraints with names ending in one of the selected suffixes (.001 or .002) to the appropriate Oni character model object name with the specified suffix. Used to constrain rigs to the character models. Can be used in any object interaction mode.
To explain more clearly: The Rigify-Oni rig has two sets of bone constraints of Copy Location for the torso and torso_pivot bone, and Copy Rotation for all of the remaining bones in the FK and Torso layers. They are responsible for copying rotation and location data from the targeted character models, with the influence of those constraints being controlled with the corresponding Pose Matching bones (Pose1 for .001 constraints and Pose2 for .002). The character models will always have their body objects named the same way (pelvis, torso, chest, etc.), and because of that, Blender adds suffixes to their names as more characters are imported, starting with ".001" suffix.
Because of this, the way to constrain an instance of the Rigify-Oni rig to the given character model is to set the target names of the .001 or .002 bone constraint targets to the appropriate Oni character model objects with the appropriate suffix. (BlenderOni has the Oni character model object names hardcoded, it only needs their suffix)
Example: You want to constrain rig.001, to the character model with .003 suffix through the rig's .002 bone constraints. To do that, you need to:
- Input rig.001 as the target rig name,
- Select .002 as the Bone constraints' suffix,
- Input .003 as the Target objects' suffix,
- Press Set Rig Bone Constraints Targets.
- Make sure Pose1 bone is below the floor level (Y<0)
- Make sure Pose2 bone is above the floor level (Y>0.1)
Rig.001 will now be constrained to the Oni character model with .003 suffix.
Constrain Character Model
On the selected Oni character model, creates a set of Copy Location and Copy Rotation constraints targeting a specified rig. Effectively constrains the selected Oni character model to the specified rig. Can be used in any object interaction mode.
If any of the model objects already contain any constrains, BlenderOni will output an error, and the user should clear all constraints in the selected objects.

