UnrealOni/Documentation: Difference between revisions
Paradox-01 (talk | contribs) m ("toc toc" "who's there" "more sections") |
m (/cat) |
||
| (16 intermediate revisions by 2 users not shown) | |||
| Line 7: | Line 7: | ||
====Video==== | ====Video==== | ||
; | ;Intro video | ||
; | ;Ingame videos | ||
| Line 43: | Line 43: | ||
===Export=== | ===Export=== | ||
==Startup visuals== | |||
'''Splash screen''' | |||
It's not a level splash screen. It's shown when the game starts. In 600 x 200 pixel. | |||
Settings > Project Settings > Platforms > Windows > Splash | |||
:Editor Splash, Game Splash | |||
Watch out for ''dead space'' at the left bottom area as it gets occupied at runtime by text displaying the engine version, the game's name, copyright, and loading progress. | |||
<gallery> | |||
Image:UE4_ProjectSettings_SplashScreen.png|right|thumb|Spash screens and game icon | |||
Image:UnrealOni_ProjectSettings_SplashScreen_at_runtime.png|right|thumb|Editor spash screen at runtime | |||
</gallery> | |||
'''Game icon''' | |||
Beneath the Splash, the Game Icon can be set. In 256 x 256 pixel. | |||
: For Photoshop there is a free plugin available for making *.ico files. | |||
'''Videos''' | |||
;Show Intro video | |||
:Settings > Project Settings > (Project section) Movies | |||
:Wait for Movies to Complete [x] (prevent bug from closing video automatically right after start) | |||
:Movies Are Skippable [x] | |||
:Add element to array, insert an MP4 video | |||
:Some older engine versions require the MP4 to have 25 fps. | |||
:Bug: On Windows the mouse cursor will be shown during video playback. | |||
An animated intro would be nice but that's unfeasible for us. Instead ingame cutscenes could be used. | |||
;Display other videos in fullscreen, e.g. for Outro | |||
:https://www.youtube.com/watch?v=W_nSACYTIvY | |||
==General notes on using blueprints== | ==General notes on using blueprints== | ||
[[Image:UnrealOni_working_with_blueprints_1_expose_options_from_reference.png|right|thumb|Exposing object-specific nodes by pulling a pin out of a reference]] | [[Image:UnrealOni_working_with_blueprints_1_expose_options_from_reference.png|right|thumb|Exposing object-specific nodes by pulling a pin out of a reference]] | ||
When right-clicking on | When right-clicking on an empty BP grid then by default you will see pre-selected categories and nodes. | ||
In rare cases you have to disable the Context Sensitive option to get all possible nodes. | In rare cases you have to disable the Context Sensitive option to get all possible nodes. | ||
To get Variables and functions from specific | To get Variables and functions from a specific object you need a reference of that object first. | ||
Connections can be double-clicked to get a Detour node. When you hover a Detour node with a little offset you will notice a changed mouse cursor, indicating that the node can be moved. | Connections can be double-clicked to get a Detour node. When you hover a Detour node with a little offset you will notice a changed mouse cursor, indicating that the node can be moved. | ||
| Line 167: | Line 206: | ||
====Munitionfrenzy==== | ====Munitionfrenzy==== | ||
[[Image:UnrealOni_cheatcodes_munitionfrenzy.png|right|thumb|Weapon cheat "munitionfrenzy"]] | [[Image:UnrealOni_cheatcodes_munitionfrenzy.png|right|thumb|Weapon cheat "munitionfrenzy"]] | ||
[[Image:UnrealOni_variable_of_type_object_class.png|right|thumb|Setting a variable to type object '''class''']] | |||
Creating an array of weapon classes requires to go into the side menu of the variable where you can chose between instances, classes, and soft references. | |||
:For RealOni we should better have the means to fill that array automatically. | |||
The nodes for all the locations and rotations are meant to spawn the weapons in a circle whereby the player stands in the center. | The nodes for all the locations and rotations are meant to spawn the weapons in a circle whereby the player stands in the center. | ||
| Line 188: | Line 230: | ||
==Debugging== | ==Debugging== | ||
===Live scripting=== | ===Live scripting=== | ||
In Oni you can do some scripting with the developer console. | In Oni you can do some scripting with the developer console. | ||
| Line 208: | Line 249: | ||
Todo: Use = sign and spaces as separator and a select node to handle the different variables and functions. | Todo: Use = sign and spaces as separator and a select node to handle the different variables and functions. | ||
<gallery> | |||
Image:UnrealOni_dev_console.png|right|thumb|Dev console (construction) | |||
</gallery> | |||
===Sample functions and variables=== | ===Sample functions and variables=== | ||
;ai2_chump | ;ai2_chump | ||
| Line 222: | Line 265: | ||
Also, the attached ai2_followme is not implemented yet. | Also, the attached ai2_followme is not implemented yet. | ||
<gallery> | |||
Image:UnrealOni_console_func_ai2_chump.png|right|thumb|Function ai2_chump | |||
Image:UnrealOni_console_func_ai2_chump_result.png|right|thumb|ai2_chump called from a custom dev console | |||
</gallery> | |||
==Ingame menus== | |||
===Text pages=== | |||
'''Styles''' | |||
Requirements for text pages with multiple styles: | |||
* User widget (blueprint) | |||
* Rich text block | |||
* Data table (blueprint) with row structure "Rich Text Style Row" | |||
* A new font file (if necessary) | |||
Procedure: | |||
* Add some default text to the rich text block | |||
* Add a default row to the data table named "Default" and set the other defaults including the font | |||
* Move and save rich text block in order to see changes | |||
* Add more rows to the data table, those are the style | |||
** Row name equals tag name which can be used in the rich text block | |||
** Tags are to be used like HTML. <code>This is a text in default style and <nowiki><xeno30>this is a text in a style I named xeno30.</xeno30></nowiki></code> | |||
[YT tutorial https://www.youtube.com/watch?v=msy7bRDpKF4] | |||
<gallery> | |||
Image:UnrealOni_rich_text_block_for_multiple_styles_user_widget.png|right|thumb|User widget with rich text block | |||
Image:UnrealOni_rich_text_block_for_multiple_styles_data_table.png|right|thumb|Data table for rich text block styles | |||
</gallery> | |||
'''Images in rich text block''' | |||
These images can serve as inline images, being only as big as the default text. | |||
Requirements: | |||
* RichTextBlockImageDecorator (blueprint) | |||
* Data table (blueprint) with row structure "Rich Image Row" | |||
Procedure: | |||
* Add images to that new data table | |||
* Use image tags in rich text block as following: <code><nowiki><img id="tagName"></></nowiki></code> | |||
===Diary=== | |||
===Main menu=== | |||
| Line 240: | Line 329: | ||
We could make many tables but let's keep that number low. They will serve as milestones. | We could make many tables but let's keep that number low. They will serve as milestones. | ||
So if these are done we can say: "Yep, it all possible." Cheats deal with levels, characters, AI, weapons, inventory, animations and particle. So it's a good overview. | So if these are done we can say: "Yep, it's all possible." Cheats deal with levels, characters, AI, weapons, inventory, animations and particle. So it's a good overview. | ||
===Cheats=== | |||
{| class="wikitable" width="100%" | {| class="wikitable" width="100%" | ||
|- | |- | ||
!width="100"|Cheat | !width="100"|Cheat | ||
| Line 323: | Line 412: | ||
|- | |- | ||
|munitionfrenzy | |munitionfrenzy | ||
| | |ok | ||
| | | | ||
|- | |- | ||
|fistsoflegend | |fistsoflegend | ||
| Line 370: | Line 459: | ||
|reserved for current testing | |reserved for current testing | ||
|} | |} | ||
===Systems=== | |||
{| class="wikitable" width="100%" | |||
|- | |||
!width="100"|Cheats | |||
!width="50"|Status | |||
!Notes | |||
|- | |||
|Dev mode | |||
| | |||
| | |||
|- | |||
|Main Menu | |||
| | |||
| | |||
|- | |||
|Pause/help menu, diary and text pages | |||
| | |||
| | |||
|- | |||
|CJBO | |||
| | |||
| | |||
{| class="wikitable" width="100%" | |||
|- | |||
|width="50"|CHAR | |||
|width="50"| | |||
| | |||
|- | |||
|CMBT | |||
| | |||
| | |||
|- | |||
|CONS | |||
| | |||
| | |||
|- | |||
|DOOR | |||
| | |||
| | |||
|- | |||
|FLAG | |||
| | |||
| | |||
|- | |||
|FURN | |||
| | |||
| | |||
|- | |||
|MELE | |||
| | |||
| | |||
|- | |||
|NEUT | |||
| | |||
| | |||
|- | |||
|PART | |||
| | |||
| | |||
|- | |||
|PATR | |||
| | |||
| | |||
|- | |||
|PWRU | |||
| | |||
| | |||
|- | |||
|TRGV | |||
| | |||
| | |||
|- | |||
|TRIG | |||
| | |||
| | |||
|- | |||
|TURR | |||
| | |||
| | |||
|- | |||
|WEAP | |||
| | |||
| | |||
|} | |||
|- | |||
|Level objects and materials | |||
| | |||
| | |||
|- | |||
|Levels | |||
| | |||
| | |||
* Demo content | |||
* Documentation | |||
** Collisions | |||
** Modular construction | |||
** Level streaming? | |||
|- | |||
|Level management | |||
| | |||
| | |||
* Splashscreen handling | |||
* Level load routine | |||
* Savegames | |||
|- | |||
|Characters | |||
| | |||
| | |||
* ONCC component | |||
* ''Difficulty upgrade'' (ONCV) | |||
* Documentation | |||
** Import | |||
** Adjustments | |||
|- | |||
| AI | |||
| | |||
| | |||
* Perception | |||
* Behaviour | |||
|- | |||
|Animations and H2H combat | |||
| | |||
| | |||
* Standing and special idle | |||
* Running and evasion | |||
* Jumping | |||
* Crouching and sneaking | |||
* Prone mode | |||
* H2H collisions | |||
** Blocks | |||
** Standard attacks | |||
** Mechanics for the 7 damage factor types | |||
** Throws | |||
** Variants | |||
* Overlay anims | |||
** Aiming | |||
|- | |||
|Particles | |||
| | |||
| | |||
* FX | |||
* Behaviour (movements, attractors, physics) | |||
* Damage | |||
* Healing | |||
* Function calling | |||
|- | |||
|Sounds | |||
| | |||
| | |||
|- | |||
|Impacts | |||
| | |||
|Can and should this be centralized? (ONIE) | |||
|- | |||
|Cameras | |||
| | |||
| | |||
* 3rd person view | |||
* Free camera | |||
|- | |||
|Cinematics | |||
| | |||
| | |||
* BP logic | |||
* FILM equivalent | |||
* letterbox | |||
* subtitles | |||
|} | |||
==Things that possibly need C++== | |||
* Permutation of soundtrack parts | |||
* Fine-tuned jetpack mechanics | |||
[[Category:Fan-made games]] | |||
Latest revision as of 20:39, 23 June 2020
Assets
Import
Images
Unprocessed files like PNG can be imported by drag and drop in the Content Browser.
They will be saved as .uasset in the folder you dropped the original file.
Video
- Intro video
- Ingame videos
Sound
Data tables
Meshes
Levels
Characters
Animations
Logic
- Blueprints ?
- C++ ?
Data migration
Updating content
Export
Startup visuals
Splash screen
It's not a level splash screen. It's shown when the game starts. In 600 x 200 pixel.
Settings > Project Settings > Platforms > Windows > Splash
- Editor Splash, Game Splash
Watch out for dead space at the left bottom area as it gets occupied at runtime by text displaying the engine version, the game's name, copyright, and loading progress.
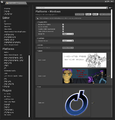
Spash screens and game icon

Editor spash screen at runtime

Game icon
Beneath the Splash, the Game Icon can be set. In 256 x 256 pixel.
- For Photoshop there is a free plugin available for making *.ico files.
Videos
- Show Intro video
- Settings > Project Settings > (Project section) Movies
- Wait for Movies to Complete [x] (prevent bug from closing video automatically right after start)
- Movies Are Skippable [x]
- Add element to array, insert an MP4 video
- Some older engine versions require the MP4 to have 25 fps.
- Bug: On Windows the mouse cursor will be shown during video playback.
An animated intro would be nice but that's unfeasible for us. Instead ingame cutscenes could be used.
- Display other videos in fullscreen, e.g. for Outro
- https://www.youtube.com/watch?v=W_nSACYTIvY
General notes on using blueprints

When right-clicking on an empty BP grid then by default you will see pre-selected categories and nodes.
In rare cases you have to disable the Context Sensitive option to get all possible nodes.
To get Variables and functions from a specific object you need a reference of that object first.
Connections can be double-clicked to get a Detour node. When you hover a Detour node with a little offset you will notice a changed mouse cursor, indicating that the node can be moved.
Detour nodes are used to visually organized the connections.
Mouse cursor


Tested in version 4.18, 4.22
- create a png with transparent edges, import it
- create a user widget, open it
- drag and drop the mouse cursor asset into the widget designer
- make it 32x32 in size 0, 0 in position
- compile and save
- open project settings
- Engine > User Interface > Software Cursors
- Add a new software cursor with "Default" option and pick your newly create cursor widget as map element.
- The cursor might act strange in the editor's play mode. This should go away as soon as you test it via Lunch.
- Finetune the widget image by moving it in the upper left corner. If its size is 32x32 then use the half (16) for the X and Y positioning.
- Note of warning: DPI scaling doesn't seem to affect the mouse cursor at all.
User Input
Key binding

You can bind actions to key (or other inputs) by going into Project Settings > Engine > Input.
Multiple keys for one action are also possible.
Note how movements use a scale for allow for eventually different direction values.
Processing
Double check: Input like key presses shouldn't be consumed by a character because characters can be replaced while playing.
The logic should be stored inside a controller otherwise you have to duplicate a lot of code inside all the characters, not to mention to keep that code up to date.
- Movement controls might live inside the character BP.
- Player-specific controls like opening the help menu should be inside a controller.
- Create a new AI controller, name it something like OniPlayerController
- Select the character in the world outliner or viewport, Ctrl + E to open the BP
- Search for "Controller" and set the "AI Controller Class" to the new OniPlayerController
- Add logic to the player controller (see Pause game)
Ignore inputs and pause game

Since F1 is used to switch into wireframe mode in UEditor, we will bind # to pause the game as we need the regular keys (any letter of the alphabet for the cheat code input).
Normally key inputs are ignored when the game is paused.
In order to unpause the game we need to set the key to "Execute when Paused [x]" in the details panel.
Theoretically a flipflop could be used to register the second key input but the game could have been paused by other means so it is better to use an variable here. Luckily Unreal provides just that as a boolean node.
To let the game behave like a typical game pause inputs for character move and look are ignored. This is actually redundant as the game is paused.
- We can recycle those ignore nodes later for game menus that don't require the game to pause.
Cheat codes


Unreal has a Cheat code class but that doesn't ship with cooked games.
Also, to detect combinations of keys pressed ("shapeshifter", "lifeforever", etc.) we would have to write our own code anyway.
Instead of detecting each key press individually we can use the Any key event and then get key names, mostly capitalized letters for standard alphabet characters.
The letters will be stored in a string which we will keep at a maximum length of the longest cheat. The string is then compared against an array of cheat codes.
The string is cleared as soon as a cheat is found. A case select a.k.a. switch node can handle the different cheat functions.
Carousel

Carousel uses the "Set Global Time Dilation" node and that's it.
Other games usually have a smooth transition from normal play speed to slowmotion and vice versa, but that is not the case for Oni.
If we really wanted to we could add a timeline node for a smooth transition.
Also, fast mode could probably be bundled with this function.
Character scaling

This is basically one function with two free parameters, one for the scaling and one for the cheat name.
The central property in this code is the Actor Scale 3D for which we will set the scaling as following:
- minime (0.5)
- behemoth (2)
- godzilla (4)
For toggling we need some checking on what is active. Booleans can work but with more different scaling more booleans are needed.
Instead we use read the current "Actor Scale 3D" via "Get", break that vector to floats and compare the X one against of our new scaling float.
If the input has the same value we will reset the scale to 1, bringing the character back to normal size.
The second parameter for the cheat name is purely decorative, it is only for the status message.
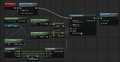
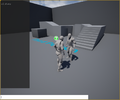
Munitionfrenzy


Creating an array of weapon classes requires to go into the side menu of the variable where you can chose between instances, classes, and soft references.
- For RealOni we should better have the means to fill that array automatically.
The nodes for all the locations and rotations are meant to spawn the weapons in a circle whereby the player stands in the center.
Kangaroo

For higher jumps we need bigger values for the "Jump ZVelozity" node.
In Oni jumps have a jetpack timer: the longer the jump action the higher the character will be eventually.
That feature is very important for the "marypoppins" cheat.
Marypoppins
Debugging
Live scripting
In Oni you can do some scripting with the developer console.
We probably should also allow to call functions and set some variables like ai2_chump and chr_debug_characters = 1.
This requires a user widget and a key binding which will be # + Alt by default.
- The ^ sign is a bad choice as it is not consumed and will be added to the first character, making âi2_chump an invalid command.
- The dev console will not require a cheat in order to activate it on key press. While developing this test it won't make sense to restrict its access.
The widget is created by the player controller and attached to the viewport.
Alt + # will toggle the visibility and makes the input box ready for typing.
The text box has a On Text Committed where inputs can be processed.
Clear Keyboard Focus on Commit was set to False in order to allow repetitive input.
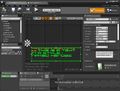
Todo: Use = sign and spaces as separator and a select node to handle the different variables and functions.
Dev console (construction)

Sample functions and variables
- ai2_chump
ai2_chump spawns a character, always face-to-face and 100 units away.
A better "chump" character is meant to implemented later, matching player's team id when ONCC component is done.
Also, the attached ai2_followme is not implemented yet.
Function ai2_chump
ai2_chump called from a custom dev console


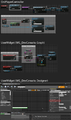
Text pages
Styles
Requirements for text pages with multiple styles:
- User widget (blueprint)
- Rich text block
- Data table (blueprint) with row structure "Rich Text Style Row"
- A new font file (if necessary)
Procedure:
- Add some default text to the rich text block
- Add a default row to the data table named "Default" and set the other defaults including the font
- Move and save rich text block in order to see changes
- Add more rows to the data table, those are the style
- Row name equals tag name which can be used in the rich text block
- Tags are to be used like HTML.
This is a text in default style and <xeno30>this is a text in a style I named xeno30.</xeno30>
[YT tutorial https://www.youtube.com/watch?v=msy7bRDpKF4]
User widget with rich text block
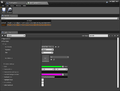
Data table for rich text block styles


Images in rich text block
These images can serve as inline images, being only as big as the default text.
Requirements:
- RichTextBlockImageDecorator (blueprint)
- Data table (blueprint) with row structure "Rich Image Row"
Procedure:
- Add images to that new data table
- Use image tags in rich text block as following:
<img id="tagName"></>
Diary
Physics
Gravity
Objects
Set Simulate Physics and Enable Gravity
- In blueprint of object > Viewport tab (while mesh is selected) > Properties panel > Physics tab
Set Simulate Physics and Enable Gravity with Blueprints nodes
- Set Simulate Physics and Set Enable Gravity
- If you disable Can Characters Step Up On via a Set node the object is still kickable.
- These settings are interesting for pickup items such as powerups and weapons.
Table of content
We could make many tables but let's keep that number low. They will serve as milestones.
So if these are done we can say: "Yep, it's all possible." Cheats deal with levels, characters, AI, weapons, inventory, animations and particle. So it's a good overview.
Cheats
| Cheat | Status | Notes |
|---|---|---|
| shapeshifter | needs data collection means | |
| liveforever | needs health system | |
| touchofdeath | needs health system | |
| canttouchthis | needs anim/throw system | |
| fatloot | needs inventory | |
| glassworld | needs material system | |
| winlevel | needs level management | |
| loselevel | needs level management | |
| bighead | needs character/anim system | |
| minime | ok | RealOni imp.: adjust animation speeds based on char scale |
| superammo | needs weapon system | |
| thedayismine | needs implementation of more debug features and char/weap cycling | |
| reservoirdogs | needs AI system | |
| roughjustice | needs weapon system | |
| behemoth | ok | RealOni imp.: adjust animation speeds based on char scale |
| chenille | needs health, particle and daodan system | |
| elderrune | needs health system | |
| moonshadow | needs material management | |
| munitionfrenzy | ok | |
| fistsoflegend | needs anim system | |
| killmequick | needs AI system | |
| carousel | ok | |
| bigbadboss | needs health and weapon system | |
| buddha | needs health system | |
| bulletproof | needs health and weapon system | |
| kangaroo | ok | |
| marypoppins | needs jetpack mechanics | |
| shinobi | needs health, weapon, sound and AI system | |
| godzilla | ok | RealOni imp.: adjust animation speeds based on char scale and could be extended to test destroyable furniture and buildings |
| test | reserved for current testing |
Systems
| Cheats | Status | Notes | |||||||||||||||||||||||||||||||||||||||||||||
|---|---|---|---|---|---|---|---|---|---|---|---|---|---|---|---|---|---|---|---|---|---|---|---|---|---|---|---|---|---|---|---|---|---|---|---|---|---|---|---|---|---|---|---|---|---|---|---|
| Dev mode | |||||||||||||||||||||||||||||||||||||||||||||||
| Main Menu | |||||||||||||||||||||||||||||||||||||||||||||||
| Pause/help menu, diary and text pages | |||||||||||||||||||||||||||||||||||||||||||||||
| CJBO |
| ||||||||||||||||||||||||||||||||||||||||||||||
| Level objects and materials | |||||||||||||||||||||||||||||||||||||||||||||||
| Levels |
| ||||||||||||||||||||||||||||||||||||||||||||||
| Level management |
| ||||||||||||||||||||||||||||||||||||||||||||||
| Characters |
| ||||||||||||||||||||||||||||||||||||||||||||||
| AI |
| ||||||||||||||||||||||||||||||||||||||||||||||
| Animations and H2H combat |
| ||||||||||||||||||||||||||||||||||||||||||||||
| Particles |
| ||||||||||||||||||||||||||||||||||||||||||||||
| Sounds | |||||||||||||||||||||||||||||||||||||||||||||||
| Impacts | Can and should this be centralized? (ONIE) | ||||||||||||||||||||||||||||||||||||||||||||||
| Cameras |
| ||||||||||||||||||||||||||||||||||||||||||||||
| Cinematics |
|
Things that possibly need C++
- Permutation of soundtrack parts
- Fine-tuned jetpack mechanics