XML:BINA/OBJC/TRIG: Difference between revisions
m (copy-edit) |
m (→Laser rotations: localized image) |
||
| Line 228: | Line 228: | ||
The hardest part in setting up triggers is pointing them in the correct direction. Here are the Rotation numbers for each direction. | The hardest part in setting up triggers is pointing them in the correct direction. Here are the Rotation numbers for each direction. | ||
[[Image:Trigger rotation.jpg]] | |||
Laser Direction 0: | Laser Direction 0: | ||
Latest revision as of 22:57, 7 May 2022
| TRIG : Trigger | 
| |
|---|---|---|
| XML
AKEV << Other file types >> CONS TMBD << Other BINA >> ONIE TRGV << Other OBJC >> TURR |
General information
- The XML on this page was tested with OniSplit v0.9.94.0.
- BINACJBOTrigger is level-specific (levelx_Final.dat).
BSL support
| Command | Description | Example |
|---|---|---|
| marketing_line_off | turns the laser line off | marketing_line_off = 1 |
| trig_activate trigger_id:int | activates a trigger | trig_activate 2 |
| trig_deactivate trigger_id:int | deactivates a trigger | trig_deactivate 2 |
| trig_hide trigger_id:int | hides a trigger, disables also laser | trig_hide 91 |
| trig_show trigger_id:int | shows a trigger | trig_show 91 |
| trig_speed trigger_id:int volume:float | sets a triggers speed | trig_speed 514 .15 |
| trig_reset trigger_id:int | resets a trigger to non-triggered state | trig_reset 91 |
File structure
<?xml version="1.0" encoding="utf-8"?>
<Oni>
   <Objects>
       [...]
   </Objects>
</Oni>
[...] means at least one trigger. Paste all your trigger data in there (this includes the <TRIG Id="...">/</TRIG> tag).
Example
       <TRIG Id="8136">
           <Header>
               <Flags></Flags>
               <Position>-445 68 -1362</Position>
               <Rotation>270 8.65141646E-06 180.000015</Rotation>
           </Header>
           <OSD>
               <Class>trigger_long</Class>
               <TriggerId>1</TriggerId>
               <Flags>44</Flags>
               <LaserColor>0 0 255</LaserColor>
               <StartPosition>0</StartPosition>
               <Speed>0</Speed>
               <EmitterCount>3</EmitterCount>
               <Offset_0075>0</Offset_0075>
               <Offset_0077>0</Offset_0077>
               <Events>
                   <Script Function="calling_this_BSL_function" />
                   <ActivateTurret TargetId="1" />
                   <DeactivateTurret TargetId="2" />
                   <ActivateConsole TargetId="3" />
                   <DeactivateConsole TargetId="4" />
                   <ActivateAlarm TargetId="5" />
                   <DeactivateAlaram TargetId="6" />
                   <ActivateTrigger TargetId="7" />
                   <DeactivateTrigger TargetId="8" />
                   <LockDoor TargetId="9" />
                   <UnlockDoor TargetId="10" />
               </Events>
           </OSD>
       </TRIG>
Tags
| Tag | Type | Description |
|---|---|---|
| <TRIG Id="..."> | integer | You can also use <TRIG> without the ID parameter. |
| <Header> | - | |
| <Flags> | flag | Used in the past. |
| <Position> | float x3 | Trigger is spawned at this XYZ position. |
| <Rotation> | float x3 | Trigger has this XYZ rotation (in degrees). |
| <OSD> | - | |
| <Class> | char[63] | TRIGfile.oni
This is a link to TRIG (trigger class), which holds the M3GM (3D model) of the rail and links to TRGE (laser emitter class) and OBAN (animation of the 3D model). Original classes:
|
| <TriggerId> | int16 | Used by BSL commands. Is it possible to use the same ID for different triggers? |
| <Flags> | flags |
|
| <LaserColor> | color | RGB value, e.g. <LaserColor>255 0 77</LaserColor> |
| <StartPosition> | float | Start position of the trigger in the rail; ranges from 0.0 (bottom) to 1.0 (top) in relation to the spawn point of the trigger (spawn point = bottom). |
| <Speed> | float | This is one of two multipliers. The second multiplier can be set via the BSL command trig_speed id speed.
total_speed = OBAN_speed * multiplier in file * multiplier in BSL So if one of the multipliers is set to 0, the trigger will stop moving. |
| <EmitterCount> | int16 | Number of emitters to spawn on the rail? |
| <TimeOn> | int16 | Number of frames that laser should be on in a power cycle. |
| <TimeOff> | int16 | Number of frames that laser should be off in a power cycle. |
| <Events> | - | int16 array. You can use multiple events. |
| <Script Function="call_this_BSL_function" /> | char[32] | Name of linked BSL function. For example if you use "call_this_BSL_function" here, then write in the BSL script:
func call_this_BSL_function
{
     dmsg "hi"
}
|
| <ActivateTurret TargetId="Id" /> | int16 | |
| <DeactivateTurret TargetId="Id" /> | int16 | |
| <ActivateConsole TargetId="Id" /> | int16 | |
| <DeactivateConsole TargetId="Id" /> | int16 | |
| <ActivateAlarm TargetId="Id" /> | int16 | |
| <DeactivateAlaram TargetId="Id" /> | int16 | |
| <ActivateTrigger TargetId="Id" /> | int16 | |
| <DeactivateTrigger TargetId="Id" /> | int16 | |
| <LockDoor TargetId="Id" /> | int16 | |
| <UnlockDoor TargetId="Id" /> | int16 |
Laser rotations
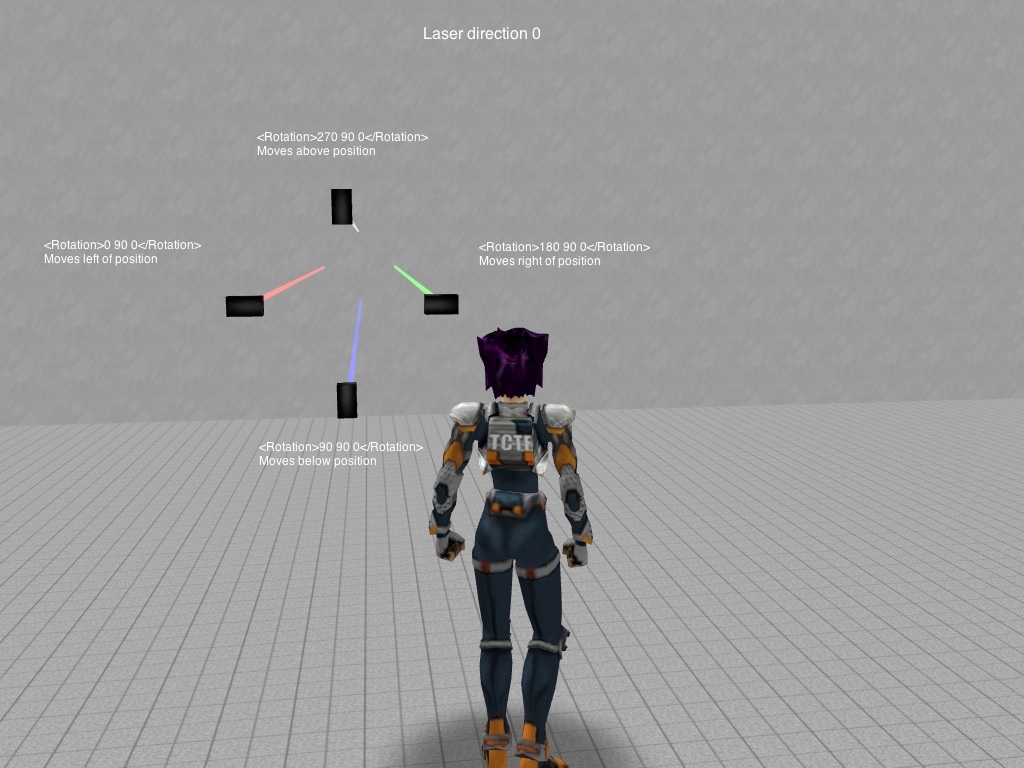
The hardest part in setting up triggers is pointing them in the correct direction. Here are the Rotation numbers for each direction.
Laser Direction 0:
- <Rotation>0 90 0</Rotation>: Moves left of position
- <Rotation>180 90 0</Rotation>: Moves right of position
- <Rotation>270 90 0</Rotation>: Moves above position
- <Rotation>90 90 0</Rotation>: Moves below position
Laser Direction 90:
- <Rotation>0 180 0</Rotation>: Moves left of position
- <Rotation>180 180 0</Rotation>: Moves right of position
- <Rotation>270 180 0</Rotation>: Moves above position
- <Rotation>90 180 0</Rotation>: Moves below position
Laser Direction 180:
- <Rotation>0 270 0</Rotation>: Moves left of position
- <Rotation>180 270 0</Rotation>: Moves right of position
- <Rotation>270 270 0</Rotation>: Moves above position
- <Rotation>90 270 0</Rotation>: Moves below position
Laser Direction 270:
- <Rotation>0 0 0</Rotation>: Moves left of position
- <Rotation>180 0 0</Rotation>: Moves right of position
- <Rotation>270 0 0</Rotation>: Moves above position
- <Rotation>90 0 0</Rotation>: Moves below position

