Blender: Difference between revisions
m (link fix, +cat) |
(Added top header description, "History of Blender in Oni community" and "How to use Blender? Tutorials and resources" headers, removed a number of headers containing info from as far as 2011. Article still to be updated.) |
||
| Line 1: | Line 1: | ||
{{ | {{fmbox | ||
| text = This page should contain information up to date for Blender version 3.1. | |||
}} | |||
Blender is a free and open-source 3D computer graphics software toolset used for 3D modeling, animating, rigging, texturing, video editing, digital drawing, etc. It is the community's current 3D software of choice for modding Oni. | |||
== | ==History of Blender in Oni community== | ||
Up until 2019, the community's 3D program of choice was [[Mod Tool|XSI Mod Tool 7.5]], a free version of Autodesk Softimage from 2009. Softimage itself became discontinued in 2014, so the community was using a horribly outdated software for a long period of time. The reasons for that were two: XSI was the only software that the community could make any sense of (although very limited) and it had no problems handling Oni's assets and animations, unlike other programs. | |||
Blender during that time, although available, was widely considered as a trivia, rather than a serious 3D software. Reasons for that were multiple, with the most known being its infamously notorious user interface used up to Blender 2.79. In case of Oni, another prime reason for not using it was that importing Oni's assets to Blender was causing a number of issues, the causes of which were unknown at the time. | |||
However, Blender's user interface received a total overhaul in version 2.80, which was universally praised. This, along with the updates that Blender is receiving to this day, its light weight and countless tutorials on Youtube, made it effectively a serious competitor to the industry-standard 3D programs like Maya or 3DS Max. | |||
With Blender having become significantly more user-friendly and popular, it became more and more clear that it was necessary for the community to move on from XSI to Blender. The final straw was that it became clear that using XSI was ridiculously ineffcient, due to outdated methods used to create assets and XSI being bugged. | |||
[[ | From 2020 to 2022 a significant amount of work was done to allow modding Oni in Blender: the -blender tag was introduced to [[OniSplit]], a new [[Using_the_Rigify_animation_rig|animation rig]] tailor-fit for making Oni animations was created, along with [[BlenderOni]] - a companion tool for the said rig. With all of this done, the community can now create new content for Oni in a modern, free, commonly used and open source 3D software. | ||
==How to use Blender? Tutorials and resources== | |||
With the abundance of tutorials for Blender on Youtube, writing down tutorials on the basics of it would be reinventing the wheel, and a worse one at that. So instead, we recommend watching some of the tutorials listed below and trying to do some simple personal projects to get familiar with Blender, such as modeling simple objects like teddy bears or tables. | |||
General Blender basics: | |||
: | * [https://www.youtube.com/watch?v=RG8qK5zPqgM Wolf's 45-Minute Crash Course for Blender Virgins] (yes, seriously - this is one of the best Blender basics tutorials out there, it's particularly good if you know your basics already and you want to find out if you've missed anything) | ||
Modelling | |||
* [https://www.youtube.com/watch?v=1jHUY3qoBu8 Learn Low Poly Modeling in Blender 2.83 (Imphenzia)] | |||
Rigging | |||
* [https://www.youtube.com/watch?v=vKgH5zXIYmM Rigify (CGDive)] | |||
Documentation: | |||
* Blender has excellent documentation, available [https://docs.blender.org/manual/en/dev/modeling/meshes/editing/face/index.html HERE] | |||
==Development== | ==Development== | ||
| Line 72: | Line 39: | ||
* [https://youtu.be/XqX5wh4YeRw?t=46 Python Crash Course for Blender! - Curtis Holt] | * [https://youtu.be/XqX5wh4YeRw?t=46 Python Crash Course for Blender! - Curtis Holt] | ||
* [https://www.youtube.com/watch?v=uahfuypQQ04 Blender 2.8 Addon Development Tutorial for Beginners - Jayanam] | * [https://www.youtube.com/watch?v=uahfuypQQ04 Blender 2.8 Addon Development Tutorial for Beginners - Jayanam] | ||
==Animation rig with IK and FK== | ==Animation rig with IK and FK== | ||
Revision as of 15:29, 13 May 2022
|
|
This page should contain information up to date for Blender version 3.1. |
Blender is a free and open-source 3D computer graphics software toolset used for 3D modeling, animating, rigging, texturing, video editing, digital drawing, etc. It is the community's current 3D software of choice for modding Oni.
History of Blender in Oni community
Up until 2019, the community's 3D program of choice was XSI Mod Tool 7.5, a free version of Autodesk Softimage from 2009. Softimage itself became discontinued in 2014, so the community was using a horribly outdated software for a long period of time. The reasons for that were two: XSI was the only software that the community could make any sense of (although very limited) and it had no problems handling Oni's assets and animations, unlike other programs.
Blender during that time, although available, was widely considered as a trivia, rather than a serious 3D software. Reasons for that were multiple, with the most known being its infamously notorious user interface used up to Blender 2.79. In case of Oni, another prime reason for not using it was that importing Oni's assets to Blender was causing a number of issues, the causes of which were unknown at the time.
However, Blender's user interface received a total overhaul in version 2.80, which was universally praised. This, along with the updates that Blender is receiving to this day, its light weight and countless tutorials on Youtube, made it effectively a serious competitor to the industry-standard 3D programs like Maya or 3DS Max.
With Blender having become significantly more user-friendly and popular, it became more and more clear that it was necessary for the community to move on from XSI to Blender. The final straw was that it became clear that using XSI was ridiculously ineffcient, due to outdated methods used to create assets and XSI being bugged.
From 2020 to 2022 a significant amount of work was done to allow modding Oni in Blender: the -blender tag was introduced to OniSplit, a new animation rig tailor-fit for making Oni animations was created, along with BlenderOni - a companion tool for the said rig. With all of this done, the community can now create new content for Oni in a modern, free, commonly used and open source 3D software.
How to use Blender? Tutorials and resources
With the abundance of tutorials for Blender on Youtube, writing down tutorials on the basics of it would be reinventing the wheel, and a worse one at that. So instead, we recommend watching some of the tutorials listed below and trying to do some simple personal projects to get familiar with Blender, such as modeling simple objects like teddy bears or tables.
General Blender basics:
- Wolf's 45-Minute Crash Course for Blender Virgins (yes, seriously - this is one of the best Blender basics tutorials out there, it's particularly good if you know your basics already and you want to find out if you've missed anything)
Modelling
Rigging
Documentation:
- Blender has excellent documentation, available HERE
Development
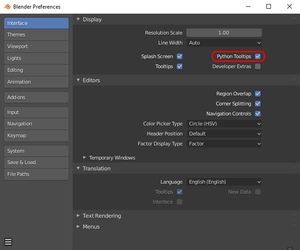
You may want to go to the preferences and switch on Python Tooltips.
Contrary to intuition, the Developer Extras do not give you additional Python functionality per se. Instead this option enables experimental Blender features.
Related videos:
- Python Crash Course for Blender! - Curtis Holt
- Blender 2.8 Addon Development Tutorial for Beginners - Jayanam
Animation rig with IK and FK
Currently we have a rig available in the form of a Blender scene available HERE. The rig was made by Geyser and Delano762, and a loose tutorial on how to use it is available HERE. The rig is based off the Rigify plugin for Blender.
The rig has these capabilities (which come with Rigify by default, unless otherwise noted):
- Snapping to Oni animations through bone constraints controlled by the Z location of the objects in the Pose Matching layer (added feature)
- Inverse and Forward Kinematics (IK and FK)
- Snapping between IK and FK chains
- Function to snap IK hand controller rotation to the wrist bone, integrated into rig_ui.py (added feature)
- IK joint poles for specifying limb joints (elbows and knees) should be facing
- Sliders specifying how much the neck, head and FK limbs should retain their world space rotation – that is, Neck Follow, Head Follow and FK Limb Follow
- IK Foot pivoting controllers around toes and the heel
- Root bone
- The rig has some scripts available for it listed below
Tutorial for creating animation rig
If you want to create the above rig, and learn a bit about rigs, IK/FK, Rigify, Blender, bone layers, bone constraints, scripts, issues with Oni models and animations such as the rotation order being incompatible with Blender, see Creating an animation rig in Blender.
Scripts
We used a number of scripts for the purpose of making the Rigify Oni rig usable, however those scripts have become obsolete with the introduction of the BlenderOni plugin. They are nonetheless archived HERE for legacy purposes.
Oni-specific issues with Blender
Rotation order issue between Oni and Blender
The previous XSI process allowed us to get to work pretty quickly: you could simply export any animation from Oni as a COLLADA file using OniSplit, then import it to XSI and it would work (mostly) without any quirks. That is not the case with Blender.
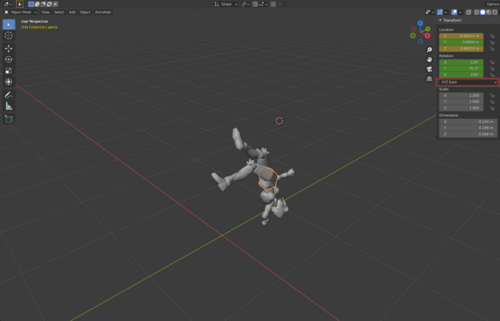
If you import any Oni animation into Blender as it is, the rotations will be all wrong.
That's because Oni's rotations are stored in XYZ Euler rotation order, while Blender's XYZ is actually ZYX despite being called "XYZ".
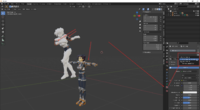
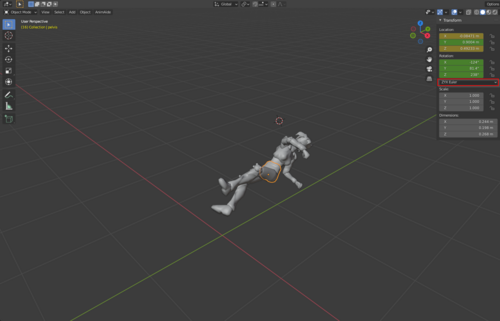
You can prove that by simply switching the rotation order of the body parts from XYZ to ZYX, as shown below – the image on the left shows KONCOMcomb_p imported to Blender without any adjustments, with the rotation order set to Blender's default "XYZ", while the image on the right shows the same animation after switching the rotation order to ZYX.
| KONCOMcomb_p in Blender's XYZ | KONCOMcomb_p in ZYX |
|---|---|
|
|
Because of this, geyser implemented the -blender argument in OniSplit, which solves this problem by converting Oni assets' rotation order from XYZ to Quaternions and then to ZYX, and vice versa when exporting assets from Blender to Oni. So that conversion flow looks as follows:
- From Oni to Blender:
XYZ → Quaternions → ZYX
- From Blender to Oni:
ZYX → Quaternions → XYZ
To summarize: Always use the -blender argument when you're exporting assets from Oni to Blender, otherwise you can expect the problem shown in the above screenshots.
Broken alpha transparency and textures on animated models
Currently there is no option in OniSplit that would allow exporting animated models with textures. While you don't need textures for animating, they are very useful, particularly in case of Oni - the models are low detail to a point where you can lose sense of which direction elbows and knees are facing, if you don't have the textures on.
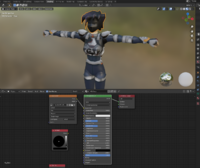
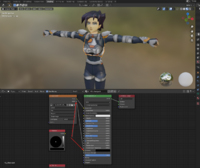
Because there is no option to export animated models with textures, the current workaround for that is to import an unanimated model with textures, then import an animated model, and either copy materials from the unanimated model to the animated one (the faster method), or set the materials on the animated model manually.
You will also most likely need to set shading settings on some body parts on the unanimated model to fix Alpha transparency issues (much like in XSI) - specifically connect the Alpha parameter of Base Color node to any parameter in Principled BSDF that will work, like Emission Strength (this should be set up differently as that's technically incorrect, but I don't know how at this moment).
| Konoko upon importing to Blender | Fixed transparency | Copying materials | Setting materials in Shading |
|---|---|---|---|
