Using the Rigify animation rig: Difference between revisions
(→Prerequisite tutorials: Added a tutorial on what IK/FK is) |
m (changed Update template to new Integrate template) |
||
| (12 intermediate revisions by 3 users not shown) | |||
| Line 1: | Line 1: | ||
{{integrate|See {{SectionLink||Tools and relevant tutorials}}, but this tutorial has also been marked for integration with<br>[[Creating an animation rig in Blender]], so check if it has been integrated there already.}} | |||
==Introduction== | ==Introduction== | ||
This article is intended to explain the workflow of using the [http://mods.oni2.net/node/388 Rigify-based animation rig for Blender] (made by geyser) for the purpose of making Oni animations, and also how to use it, and what are the Oni-specific additions to it that we've made. | This article is intended to explain the workflow of using the [http://mods.oni2.net/node/388 Rigify-based animation rig for Blender] (made by geyser) for the purpose of making Oni animations, and also how to use it, and what are the Oni-specific additions to it that we've made. | ||
==Prerequisite tutorials== | ==Prerequisite tutorials== | ||
I highly recommend watching the tutorials below if you feel you're lacking knowledge in any of these subjects: | As this rig is now intented to be used together with BlenderOni, it is necessary to be familiar with either: | ||
* [[BlenderOni|BlenderOni's documentation,]] | |||
* [https://www.youtube.com/watch?v=pA_Y8QBCvPI BlenderOni's explanatory video,] particularly time ranges from 0:00 - 3:07 and 21:24 - 48:05 (that's part 1 and 3 of the video). | |||
Besides that, I highly recommend watching the tutorials below if you feel you're lacking knowledge in any of these subjects: | |||
General Blender basics: | General Blender basics: | ||
| Line 26: | Line 32: | ||
==Required tools and commands== | ==Required tools and commands== | ||
There are several things worth knowing before you start | There are several things worth knowing before you start using the rig, tools to get and tutorials to have ready to reference for commands. | ||
===Tools and relevant tutorials=== | ===Tools and relevant tutorials=== | ||
* '''[[BlenderOni|BlenderOni]]''' - this Blender addon is an integral companion tool for this rig - it contains a number of scripts which automate a lot of operations required to make any use out of the rig. Without those scripts, these operations (e.g. constraining the model to the rig and vice versa) would have to be done manually, which takes a ridiculous amount of time. | |||
[[Image:Cmder.png|200px|right|thumb|Screenshot showing Cmder's capabilities within the context of modding Oni]] | [[Image:Cmder.png|200px|right|thumb|Screenshot showing Cmder's capabilities within the context of modding Oni]] | ||
* [http://mods.oni2.net/node/38 '''Current version of OniSplit.'''] This is the tool needed to import and export assets out of Oni. '''DO NOT USE OniSplit GUI or Vago for importing Oni assets into Blender''' - neither of these weren't updated in a long time, and thus they don't support OniSplit's v0.9.99.2 -blender option. You can still use them for other purposes though, such as sounds and converting .oni files to XMLs, etc. | * [http://mods.oni2.net/node/38 '''Current version of OniSplit.'''] This is the tool needed to import and export assets out of Oni. '''DO NOT USE OniSplit GUI or Vago for importing Oni assets into Blender''' - neither of these weren't updated in a long time, and thus they don't support OniSplit's v0.9.99.2 -blender option. You can still use them for other purposes though, such as sounds and converting .oni files to XMLs, etc. | ||
* [https://docs.google.com/document/d/175uJGklYASAgrFjxuUG4-kJRDoMTjjP7GvNxSj1GscU/edit '''Oni-Blender tutorial'''] by EdT. Please read this in entirety to know likely-to-happen issues and refer to this as your guide for OniSplit commands relating to Blender. | * [https://docs.google.com/document/d/175uJGklYASAgrFjxuUG4-kJRDoMTjjP7GvNxSj1GscU/edit '''Oni-Blender tutorial'''] by EdT. Please read this in entirety to know likely-to-happen issues and refer to this as your guide for OniSplit commands relating to Blender. | ||
* [http://oni.bungie.org/forum/viewtopic.php?pid=23230#p23230 '''Brief overview on creating TRAMs'''] by EdT - while this was written with XSI in mind, this is still relevant as the process for preparing the XML files for Oni is still the same. Also the next post in that thread, called '''Brief walk through on modifying a TRAM,''' is an example of that overview put into practice. | * [https://web.archive.org/web/20211202215118/http://oni.bungie.org/forum/viewtopic.php?pid=23230#p23230 '''Brief overview on creating TRAMs'''] by EdT - while this was written with XSI in mind, this is still relevant as the process for preparing the XML files for Oni is still the same. Also the next post in that thread, called '''Brief walk through on modifying a TRAM,''' is an example of that overview put into practice. | ||
===Optional tools and tutorials=== | |||
* [https://cmder.app/ '''Cmder'''] (Windows only) - because OniSplit is a command line tool, it is highly recommended to get any upgrade to Windows' Command Prompt. As shown in the screenshot on the right, Cmder allows you to start it from the context menu in any selected folder, and it also remembers your most recently used commands, vastly improving your workflow when you're forced to use any command line tools. | |||
* [https://docs.blender.org/manual/en/2.81/addons/rigging/rigify.html '''Rigify documentation'''] - it's a plugin for Blender designed to automate a lot of rigging work. The rig described here is generated using Rigify. Take a look if you're interested and want to learn more, but you don't have to know Rigify's documentation to use this rig. | |||
==General workflow of animating for Oni using Rigify== | ==General workflow of animating for Oni using Rigify== | ||
The most common way to animate characters is to create an armature (also known as a rig) to which the character model is constrained, usually through vertex weights specifying how much a given vertex is controlled by the given controller on a scale from 0 to 1, with all weights summing up to 1. The rig contains a number of controller bones that allow to animate more easily. Then, the animations are usually imported into the game along with the armatures, therefore the animation is stored along with the armature. An example of a game storing animations this way is Halo: Combat Evolved. | |||
Oni character models are divided into 19 rigid body parts organized in a parent-child relation, with the pelvis bone being the root bone, which effectively forms an FK rig. The animations are stored in TRAM files, containing rotation data for each of the 19 body parts, and also location data for the pelvis. There is no armature stored within the game files, therefore in order to use a rig on Oni characters, it is necessary to constrain each of the 19 body parts to the rig bones individually instead of mesh vertices. Also, this automatically means that Oni's way of storing animations is a destructive one - the data stored in the rig bones that are not direct functional equivalents to Oni character body parts will get lost once the animation is baked into body parts with Visual Transform. | |||
The general workflow of making animations using this rig is the following, assuming you want to make a single animation (i.e. you don't want to make a throw animation): | The general workflow of making animations using this rig is the following, assuming you want to make a single animation (i.e. you don't want to make a throw animation): | ||
| Line 45: | Line 58: | ||
# Import the animation you are using as a starting point. For more detailed information on how to import an Oni animation to Blender, see the next header. | # Import the animation you are using as a starting point. For more detailed information on how to import an Oni animation to Blender, see the next header. | ||
## If you did point 3, apply the textures on the animated model. | ## If you did point 3, apply the textures on the animated model. | ||
# Using the | # Using the ''Set Rig Bone Constraint Targets'' option in BlenderOni, set the targets of the rig's bone constraints to be the body parts of the animation you've imported. | ||
# Using the Pose Matching functionality, constrain the rig to the imported animation (Set the IK-FK sliders on rig limbs to 1, as Pose Matching works only through FK controllers) | # Using the Pose Matching functionality, constrain the rig to the imported animation (Set the IK-FK sliders on rig limbs to 1, as Pose Matching works only through FK controllers) | ||
# For each frame that you want to remain in your animation, while having all the bones selected (or the ones you want), | # For each frame that you want to remain in your animation, while having all the bones selected (or the ones you want), either: | ||
# Disable bone constraints on the rig using the | ## Press Ctrl+A, select ''Apply Visual Transform'' to Pose and keyframe it, | ||
## Or use the ''Bone Visual Transformer'' option in BlenderOni to bake frames within a specified frame range. | |||
# Disable bone constraints on the rig using the ''Bone Constraint Switch'' option in BlenderOni. | |||
# '''Make your animation.''' | # '''Make your animation.''' | ||
# Once your animation is ready, use the Visual Transformer | # Once your animation is ready, use the ''Object Visual Transformer'' option in BlenderOni to bake the rig keyframes into the character model. | ||
# Using the | # Using the ''Object Constraint Switch'' option in BlenderOni, disable the object constraints on the character model. '''The character model should now be animated and have the needed rotations and locations. | ||
# Export the animation as a DAE. | # Export the animation as a DAE. | ||
| Line 68: | Line 83: | ||
# Import the animation into Blender ('''MAKE SURE YOU CHECK THE ''Import Unit'' BOX EACH TIME''', otherwise you will import the model with arbitrary units which will break everything and will be basically unadjustable later)) | # Import the animation into Blender ('''MAKE SURE YOU CHECK THE ''Import Unit'' BOX EACH TIME''', otherwise you will import the model with arbitrary units which will break everything and will be basically unadjustable later)) | ||
# Import the -noanim model into Blender ('''ALSO MAKE SURE YOU CHECK THE ''Import Unit'' BOX''') | # Import the -noanim model into Blender ('''ALSO MAKE SURE YOU CHECK THE ''Import Unit'' BOX''') | ||
# Move the animated model to either Pose1 or Pose2 collection | # Move the animated model to either Pose1 or Pose2 collection. | ||
# If you've imported the textured model, [[Blender# | # If you've imported the textured model, [[Blender#Lack_of_textures_on_animated_models|apply textures to the animated models and fix the alpha transparency issue]]. | ||
==Added functionalities== | ==Added functionalities== | ||
Latest revision as of 20:03, 26 November 2025

|
There is an Oni Central Forum post linked from this article which contains information that |
Introduction
This article is intended to explain the workflow of using the Rigify-based animation rig for Blender (made by geyser) for the purpose of making Oni animations, and also how to use it, and what are the Oni-specific additions to it that we've made.
Prerequisite tutorials
As this rig is now intented to be used together with BlenderOni, it is necessary to be familiar with either:
- BlenderOni's documentation,
- BlenderOni's explanatory video, particularly time ranges from 0:00 - 3:07 and 21:24 - 48:05 (that's part 1 and 3 of the video).
Besides that, I highly recommend watching the tutorials below if you feel you're lacking knowledge in any of these subjects:
General Blender basics:
Practical and intuitive explanation of what Inverse and Forward Kinematics (IK/FK) are - this is explained in Maya, but same principles apply in every 3D editing program including Blender:
Basics of using Rigify - all you need to know about animating with Rigify is stored in the video below. There is no point in making a tutorial on how to use the rig controllers themselves here - it's all in the video below:
(OPTIONAL) Tutorial on how to create the rig described here - this is strictly optional; the only practical reason to make your own rig is for the purpose of adjusting its controllers to a specific character, however, the advantage that you get out of that is purely visual and a marginal one at that - if you've built your rig for Konoko, there's nothing stopping you from using it on a TCTF SWAT - the limb controllers will be only slightly out of place, which doesn't impact animating in any way. So ultimately you may want to go through this if you want to learn how this rig works, find this rig confusing, or even just for the bunch of great Youtube tutorials linked in that tutorial.
Also, it's worth noting that a huge part of this article is in fact copy-pasted from this tutorial.
Required tools and commands
There are several things worth knowing before you start using the rig, tools to get and tutorials to have ready to reference for commands.
Tools and relevant tutorials
- BlenderOni - this Blender addon is an integral companion tool for this rig - it contains a number of scripts which automate a lot of operations required to make any use out of the rig. Without those scripts, these operations (e.g. constraining the model to the rig and vice versa) would have to be done manually, which takes a ridiculous amount of time.
- Current version of OniSplit. This is the tool needed to import and export assets out of Oni. DO NOT USE OniSplit GUI or Vago for importing Oni assets into Blender - neither of these weren't updated in a long time, and thus they don't support OniSplit's v0.9.99.2 -blender option. You can still use them for other purposes though, such as sounds and converting .oni files to XMLs, etc.
- Oni-Blender tutorial by EdT. Please read this in entirety to know likely-to-happen issues and refer to this as your guide for OniSplit commands relating to Blender.
- Brief overview on creating TRAMs by EdT - while this was written with XSI in mind, this is still relevant as the process for preparing the XML files for Oni is still the same. Also the next post in that thread, called Brief walk through on modifying a TRAM, is an example of that overview put into practice.
Optional tools and tutorials
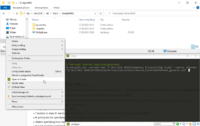
- Cmder (Windows only) - because OniSplit is a command line tool, it is highly recommended to get any upgrade to Windows' Command Prompt. As shown in the screenshot on the right, Cmder allows you to start it from the context menu in any selected folder, and it also remembers your most recently used commands, vastly improving your workflow when you're forced to use any command line tools.
- Rigify documentation - it's a plugin for Blender designed to automate a lot of rigging work. The rig described here is generated using Rigify. Take a look if you're interested and want to learn more, but you don't have to know Rigify's documentation to use this rig.
General workflow of animating for Oni using Rigify
The most common way to animate characters is to create an armature (also known as a rig) to which the character model is constrained, usually through vertex weights specifying how much a given vertex is controlled by the given controller on a scale from 0 to 1, with all weights summing up to 1. The rig contains a number of controller bones that allow to animate more easily. Then, the animations are usually imported into the game along with the armatures, therefore the animation is stored along with the armature. An example of a game storing animations this way is Halo: Combat Evolved.
Oni character models are divided into 19 rigid body parts organized in a parent-child relation, with the pelvis bone being the root bone, which effectively forms an FK rig. The animations are stored in TRAM files, containing rotation data for each of the 19 body parts, and also location data for the pelvis. There is no armature stored within the game files, therefore in order to use a rig on Oni characters, it is necessary to constrain each of the 19 body parts to the rig bones individually instead of mesh vertices. Also, this automatically means that Oni's way of storing animations is a destructive one - the data stored in the rig bones that are not direct functional equivalents to Oni character body parts will get lost once the animation is baked into body parts with Visual Transform.
The general workflow of making animations using this rig is the following, assuming you want to make a single animation (i.e. you don't want to make a throw animation):
- Open up a Blender scene containing the rig.
- Delete either the model in Pose1 or Pose2.
- (OPTIONAL) Assuming you want to animate a different character, delete the T-posed model.
- Import your desired character with textures using -noanim.
- Import the animation you are using as a starting point. For more detailed information on how to import an Oni animation to Blender, see the next header.
- If you did point 3, apply the textures on the animated model.
- Using the Set Rig Bone Constraint Targets option in BlenderOni, set the targets of the rig's bone constraints to be the body parts of the animation you've imported.
- Using the Pose Matching functionality, constrain the rig to the imported animation (Set the IK-FK sliders on rig limbs to 1, as Pose Matching works only through FK controllers)
- For each frame that you want to remain in your animation, while having all the bones selected (or the ones you want), either:
- Press Ctrl+A, select Apply Visual Transform to Pose and keyframe it,
- Or use the Bone Visual Transformer option in BlenderOni to bake frames within a specified frame range.
- Disable bone constraints on the rig using the Bone Constraint Switch option in BlenderOni.
- Make your animation.
- Once your animation is ready, use the Object Visual Transformer option in BlenderOni to bake the rig keyframes into the character model.
- Using the Object Constraint Switch option in BlenderOni, disable the object constraints on the character model. The character model should now be animated and have the needed rotations and locations.
- Export the animation as a DAE.
Importing Oni animations to Blender
This header describes how to import Oni animations to Blender.
For detailed explanation of the required OniSplit commands, please refer to the Oni-Blender Tutorial by EdT listed in the Tools and relevant tutorials.
- Assuming the character you want to animate isn't in your rig file, then using OniSplit, export any character you want as a DAE (-extract:dae) using -noanim and -blender arguments.
- As per EdT's Oni-Blender Tutorial, you should get AnimationDaeWriter: custom axis conversion in OniSplit output if you've used the -blender argument. If you didn't get that on the output, it means something most likely went wrong and you won't be able to import the model into Blender (or you will be able to import it but it will be wrong).
- Assuming you wanted a textured model and thus you've exported an ONCC, you should now get a DAE file and an images folder containing the textures for it.
- Using OniSplit, export the animation you want as an XML (-extract:xml) using -anim-body (lets you specify the character you want) and -blender arguments.
- You should get one DAE and one XML file for the animation.
- Open up a Blender scene containing the rig.
- Delete either the model either in Pose1 or Pose2 collection.
- Import the animation into Blender (MAKE SURE YOU CHECK THE Import Unit BOX EACH TIME, otherwise you will import the model with arbitrary units which will break everything and will be basically unadjustable later))
- Import the -noanim model into Blender (ALSO MAKE SURE YOU CHECK THE Import Unit BOX)
- Move the animated model to either Pose1 or Pose2 collection.
- If you've imported the textured model, apply textures to the animated models and fix the alpha transparency issue.
Added functionalities
This header describes functionalities added to the rig by geyser that are not normally present in Rigify.
Pose matching
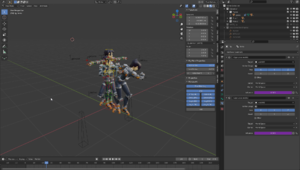
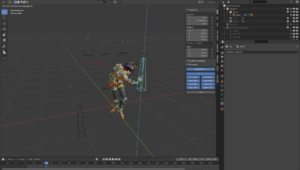
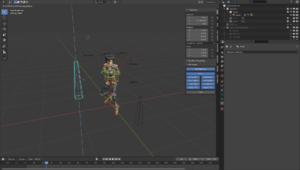
The way we do animations is we almost universally start by copying the first or last frame of the preceeding animation. For this reason, we needed functionality that would allow us to snap the rig to an animated Oni character. The way it works, it that it uses bone constraints in rig controller bones targeting the character model in order to snap the rig to the model. The influence of the bone constraints is controlled through the Z location of Pose1 and Pose2 bones in the Pose Matching layer, which is done through drivers.
To snap the rig to the animation in one of the Pose collections, simply move the appropriate Pose bone above the XY plane while in Pose mode.
| Pose1 and Pose2 below the XY plane | Rig snapped to the animation in Pose 1 collection | Rig snapped to the animation in Pose 2 collection |
|---|---|---|
Wrist snapping
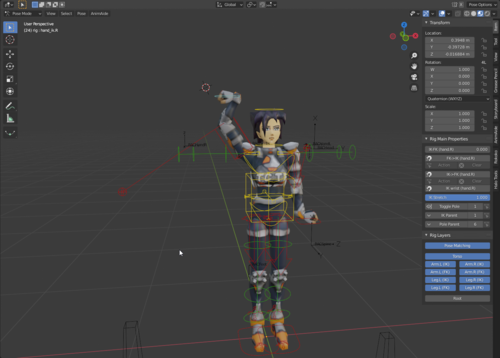
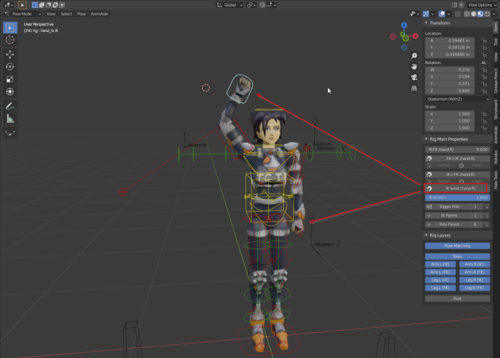
Often when using the IK handles for the arms you will find out that most of the time, you will need the hand to have the same rotation as the forearm. Normally this would mean that you would have to rotate the hands all the time, because IK handles are mainly moved around, and rotated later. For this reason, the wrist snapping functionality was implemented - you can simply copy the rotation of the forearm to the hand by pressing the "IK wrist" button.
| Both of the hands after just moving them around... | Effects of using the IK Wrist button |
|---|---|
