Blender: Difference between revisions
Paradox-01 (talk | contribs) m (oh well, let's make it equal to the note on charater import page) |
|||
| (34 intermediate revisions by 4 users not shown) | |||
| Line 1: | Line 1: | ||
Blender is a free and open-source program used for 3D modeling, animating, rigging, texturing, video editing, digital drawing, etc. It is the community's current 3D software of choice for modding Oni. | |||
==History of modding with Blender== | |||
[[Mod Tool|XSI Mod Tool 7.5]], a free version of Autodesk Softimage from 2009, had the fewest problems in handling Oni's assets and animations, it was relatively easy to learn and use. Up until 2019, it was Oni community's 3D program of choice. | |||
Blender at that time had a notoriously bad user interface and couldn't handle DAE files very well. [[#Oni-specific_issues_with_Blender|Besides other problems]], most importantly the expected rotation order and up-axis were different between XSI and Blender. | |||
Blender | |||
After an interface overhaul in version 2.80 Blender's user-friendliness and [http://oni.bungie.org/forum/viewtopic.php?pid=52588#p52588 support for vertex shading in DAE] was improved. At the same time more and more users had problems to run XSI on their PCs. | |||
By 2019 demands got louder to support Blender made animations. [[OniSplit]] received an update (<tt>-blender</tt>) so it could read such animations. Also, rigging was never fully figured out in XSI so between 2020 and 2022 an [[Using the Rigify animation rig|animation rig]] tailor-fit for making Oni animations - alongside a new addon named [[BlenderOni]] - was created. It was the last nail in the coffin of XSI. | |||
[[ | |||
==Tutorials and resources== | |||
With the abundance of tutorials for Blender on YouTube, creating our own introductory material would be reinventing the wheel. So instead we recommend watching some of the tutorials listed below and trying to make small personal projects in order to get familiar with Blender, such as modeling simple objects like teddy bears or tables. | |||
[ | General Blender basics: | ||
* [https://www.youtube.com/watch?v=RG8qK5zPqgM Wolf's 45-Minute Crash Course for Blender Virgins] (don't be misled by the silly name - this is one of the best Blender basics tutorials out there; it's also good if you know your basics already and you want to find out if you've missed anything) | |||
Modelling: | |||
* [https://www.youtube.com/watch?v=1jHUY3qoBu8 Learn Low Poly Modeling in Blender 2.83 (Imphenzia)] | |||
Rigging: | |||
: | * [https://www.youtube.com/watch?v=vKgH5zXIYmM Rigify (CGDive)] | ||
Documentation: | |||
* Blender has excellent documentation, available [https://docs.blender.org/manual/en/dev/modeling/meshes/editing/face/index.html HERE] | |||
==Development== | ==Development== | ||
[[ | [[Image:Blender_2.8_Python_Tooltips.png|thumb]] | ||
You may want to go to the preferences and switch on '''Python Tooltips'''. | You may want to go to the preferences and switch on '''Python Tooltips'''. | ||
Contrary to | Contrary to what you might expect, the '''Developer Extras''' do not give you additional Python functionality per se. Instead this option enables experimental Blender features. | ||
Related videos: | Related videos: | ||
* [https:// | * [https://www.youtube.com/watch?v=XqX5wh4YeRw&t=46s Python Crash Course for Blender! (Curtis Holt)] | ||
* [https://www.youtube.com/watch?v=uahfuypQQ04 Blender 2.8 Addon Development Tutorial for Beginners | * [https://www.youtube.com/watch?v=uahfuypQQ04 Blender 2.8 Addon Development Tutorial for Beginners (Jayanam)] | ||
== | ==Animation rig with IK and FK== | ||
Currently we have an animation rig available in the form of a Blender scene available [http://mods.oni2.net/node/388 HERE]. The rig was made by Geyser and Delano762, and a tutorial on how to use it is available [[Using the Rigify animation rig|HERE]]. The rig is based on the Rigify plugin for Blender and serves as the '''community's modern tool to create new character animations for Oni''', featuring both Forward and Inverse Kinematics – an enormous improvement over the previous FK-only method of animating. | |||
This rig is intended to be used together with [[#BlenderOni|BlenderOni]], a Blender addon designed as a companion tool for it – '''without it, the rig is extremely difficult to set up, to the point of being almost useless.''' | |||
The rig has | The rig has the following capabilities (which come with Rigify by default, unless otherwise noted): | ||
* Snapping to Oni animations through bone constraints controlled by the Z location of the objects in the Pose Matching layer (added feature) | * Snapping to Oni animations through bone constraints controlled by the Z location of the objects in the Pose Matching layer (added feature) | ||
* Inverse and Forward Kinematics (IK and FK) | * Inverse and Forward Kinematics (IK and FK) | ||
| Line 95: | Line 47: | ||
* IK joint poles for specifying limb joints (elbows and knees) should be facing | * IK joint poles for specifying limb joints (elbows and knees) should be facing | ||
* Sliders specifying how much the neck, head and FK limbs should retain their world space rotation – that is, Neck Follow, Head Follow and FK Limb Follow | * Sliders specifying how much the neck, head and FK limbs should retain their world space rotation – that is, Neck Follow, Head Follow and FK Limb Follow | ||
* IK | * IK foot pivoting controllers around toes and the heel | ||
* Root bone | * Root bone | ||
==Tutorial for creating animation rig== | ===Tutorial for creating animation rig=== | ||
If you want to create the above rig, and learn a bit about rigs, IK/FK, Rigify, Blender, bone layers, bone constraints, scripts, issues with Oni models and animations such as the rotation order being incompatible with Blender, see [[Creating an animation rig in Blender]]. | If you want to create the above rig, and learn a bit about rigs, IK/FK, Rigify, Blender, bone layers, bone constraints, scripts, issues with Oni models and animations such as the rotation order being incompatible with Blender, see [[Creating an animation rig in Blender]]. | ||
== | ==BlenderOni== | ||
BlenderOni is a Blender addon intended as an integral companion tool for the fan-made animation rig for Blender. It contains functionalities that automate a lot of operations necessary for the rig to function and be used properly. However, the vast majority of the addon's options can also be used for general Blender purposes. | |||
for | |||
For more information on BlenderOni, please check its documentation page available [[BlenderOni|HERE]]. | |||
==Blender-specific OniSplit information== | |||
For detailed instructions on how to convert Oni assets to Blender-readable files, please check [[Importing_character_models#Blender-specific_OniSplit_information| Blender-specific OniSplit information.]] | |||
==Oni-specific issues with Blender== | ==Oni-specific issues with Blender== | ||
===Fixing texture mapping of DAE files=== | |||
Replace all instances of <technique> with <technique sid="common">. | |||
===Rotation order | ===Rotation order=== | ||
The previous XSI process allowed us to get to work pretty quickly: you could simply export any animation from Oni as a COLLADA file using OniSplit, then import it to XSI and it would work (mostly) without any quirks. That is not the case with Blender. | The previous XSI process allowed us to get to work pretty quickly: you could simply export any animation from Oni as a COLLADA file using OniSplit, then import it to XSI and it would work (mostly) without any quirks. That is not the case with Blender. If you import any Oni animation into Blender as it is, the rotations will be all wrong. | ||
That's because Oni's rotations are stored in XYZ Euler rotation order, while Blender's XYZ is actually ZYX despite being called "XYZ"; this is because Blender reads the Euler angles [https://docs.blender.org/manual/en/latest/advanced/appendices/rotations.html from the bottom of the hierarchy] rather than the top. In other words, Oni reads XYZ starting with X, while Blender starts with Z. | |||
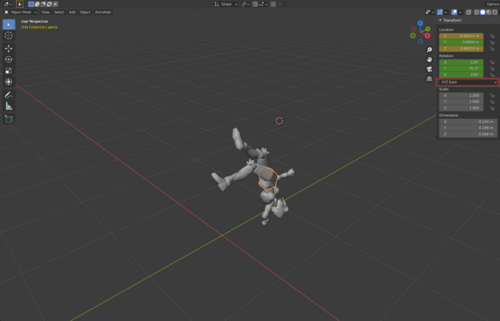
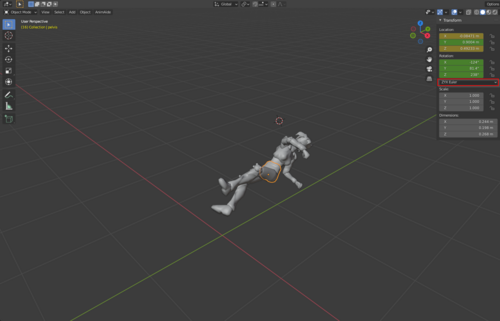
You can demonstrate this by simply switching the rotation order of the body parts from XYZ to ZYX, as shown below. The image on the left shows KONCOMcomb_p imported to Blender without any adjustments, with the rotation order set to Blender's default "XYZ", while the image on the right shows the same animation after switching the rotation order to ZYX. | |||
You can | |||
{| class="wikitable" | {| class="wikitable" | ||
| Line 209: | Line 80: | ||
|} | |} | ||
Because of this, geyser implemented the '''-blender''' argument in OniSplit, which solves this problem by converting Oni assets' rotation order from XYZ to | Because of this, geyser implemented the '''-blender''' argument in OniSplit, which solves this problem by converting Oni assets' rotation order from XYZ to quaternions and then to ZYX, and vice versa when exporting assets from Blender to Oni. So that conversion flow looks as follows: | ||
*From Oni to Blender: | *From Oni to Blender: | ||
| Line 219: | Line 90: | ||
To summarize: '''Always use the -blender argument when you're exporting assets from Oni to Blender''', otherwise you can expect the problem shown in the above screenshots. | To summarize: '''Always use the -blender argument when you're exporting assets from Oni to Blender''', otherwise you can expect the problem shown in the above screenshots. | ||
===Differing up-axis=== | |||
To be expanded on later: Oni's "up" axis is Y, Blender's is Z. | |||
===Units=== | |||
To be expanded on later: Oni's units are in the imperial system, not the metric one, though the 0.1-meter unit used by OniSplit is a good approximation of Oni's actual world unit of 4 inches. | |||
=== | ===Lack of textures on animated models=== | ||
'''Currently there is no option in OniSplit | '''Currently there is no option in OniSplit for exporting animated models with textures in a way that Blender will import.''' While you don't need textures for animating, they are very useful, particularly in the case of Oni; the models are low-detail to a point where you can lose sense of which direction elbows and knees are facing if you don't have the textures on. | ||
Because there is no option to export animated models with textures, '''the current workaround for that is to import an unanimated model with textures, then import an animated model,''' and either copy materials from the unanimated model to the animated one (the faster method), or set the materials on the animated model manually. | Because there is no option to export animated models with textures, '''the current workaround for that is to import an unanimated model with textures, then import an animated model,''' and either copy materials from the unanimated model to the animated one (the faster method), or set the materials on the animated model manually in the Shading tab. | ||
You will also most likely need to set | {| class="wikitable" | ||
|- | |||
! Copying materials | |||
|- | |||
| [[Image:ABR_Copying_materials.png|200px|frameless|center]] | |||
|- | |||
|} | |||
===Alpha transparency issue=== | |||
You will also most likely need to set the Shading settings on some of the body parts of a non-animated model in order to fix alpha transparency issues (much like in XSI); specifically, you'll need to connect the Alpha parameter of the Base Color node to any parameter in Principled BSDF that will work, such as Emission Strength (this should be set up differently as that's technically incorrect, but I don't know how to do so at this moment). | |||
{| class="wikitable" | {| class="wikitable" | ||
|- | |- | ||
! Konoko upon importing to Blender !! Fixed transparency | ! Konoko upon importing to Blender !! Fixed transparency | ||
|- | |- | ||
| [[Image:ABR Konoko broken alpha.png|200px|frameless|center]] || [[Image:ABR_Konoko_fixed_alpha | | [[Image:ABR Konoko broken alpha.png|200px|frameless|center]] || [[Image:ABR_Konoko_fixed_alpha.png|200px|frameless|center]] | ||
|- | |- | ||
|} | |} | ||
[[Category:Bi-platform modding tools]] | ==Wanted== | ||
Except for sounds, textures and text-oriented resources, Blender has the potential to be THE editor for Oni. Its powerful Python support is very useful for customization. | |||
Additional imports/exports, XML/.oni file creation and configurations should be automated, and customization should be used to streamline workflows as much as possible. Tools in the form of addons should allow users to be artists instead of coders, speeding up development of the actual projects. | |||
A successful modding community requires not one of these points, but all of them: documentation, tools and tutorials. | |||
===Level editor=== | |||
* core geometry | |||
* pathfinding | |||
* "furniture" (OFGA) creation/placement | |||
* editing of CJBO | |||
* special gunk flag placement | |||
* basic level shading (vertex shading) | |||
* advanced level shading for OniX? | |||
'''OFGA library''' | |||
Objects that are used pretty often should be provided either by Blender Asset Browser or by a customized solution. | |||
* Blender Asset Browser video demo: https://www.youtube.com/watch?v=gJC0y6HqyAU | |||
===BSL editor=== | |||
Most events in Oni are fired using trigger volumes. There should be an editor to open the code of a trigger volume as soon as it's selected in Blender. | |||
Also, character functions should editable when you select a character. | |||
The editor should be context-sensitive to: | |||
* level geometry: atmosphere, save points, win level, lose level | |||
* objects: scripting of static and animated objects (cutscene editor) | |||
* particle scripting | |||
* character: after selecting a character there should be a button visible to edit the ONCC, TRBS, animations and textures (GIMP/Photoshop). | |||
===Character editor=== | |||
'''Character library''' | |||
There should be a way to place characters or character placeholders so that character collections (BINACHAR) can be saved to disk based on their positioning in the level model. | |||
===Animation editor=== | |||
The core would be BlenderOni that is called as soon as a user chooses to create or edit an animation. It could be extended to edit TRAC. | |||
===Particle editor=== | |||
A particle editor has been always missing in the community. | |||
===Testing and publishing support=== | |||
There should be some linking to Vago and AEI for package creation and quick starting of levels for testing. | |||
A secondary Oni installation could serve as a developer environment where only one level is present at a time. With OniX, it could be made possible to skip the menu UI and automatically load the current project. | |||
[[Category:Bi-platform modding tools]][[Category:Completed modding tools]] | |||
Latest revision as of 23:27, 9 April 2023
Blender is a free and open-source program used for 3D modeling, animating, rigging, texturing, video editing, digital drawing, etc. It is the community's current 3D software of choice for modding Oni.
History of modding with Blender
XSI Mod Tool 7.5, a free version of Autodesk Softimage from 2009, had the fewest problems in handling Oni's assets and animations, it was relatively easy to learn and use. Up until 2019, it was Oni community's 3D program of choice.
Blender at that time had a notoriously bad user interface and couldn't handle DAE files very well. Besides other problems, most importantly the expected rotation order and up-axis were different between XSI and Blender.
After an interface overhaul in version 2.80 Blender's user-friendliness and support for vertex shading in DAE was improved. At the same time more and more users had problems to run XSI on their PCs.
By 2019 demands got louder to support Blender made animations. OniSplit received an update (-blender) so it could read such animations. Also, rigging was never fully figured out in XSI so between 2020 and 2022 an animation rig tailor-fit for making Oni animations - alongside a new addon named BlenderOni - was created. It was the last nail in the coffin of XSI.
Tutorials and resources
With the abundance of tutorials for Blender on YouTube, creating our own introductory material would be reinventing the wheel. So instead we recommend watching some of the tutorials listed below and trying to make small personal projects in order to get familiar with Blender, such as modeling simple objects like teddy bears or tables.
General Blender basics:
- Wolf's 45-Minute Crash Course for Blender Virgins (don't be misled by the silly name - this is one of the best Blender basics tutorials out there; it's also good if you know your basics already and you want to find out if you've missed anything)
Modelling:
Rigging:
Documentation:
- Blender has excellent documentation, available HERE
Development
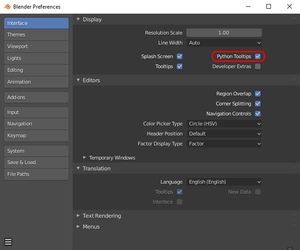
You may want to go to the preferences and switch on Python Tooltips.
Contrary to what you might expect, the Developer Extras do not give you additional Python functionality per se. Instead this option enables experimental Blender features.
Related videos:
- Python Crash Course for Blender! (Curtis Holt)
- Blender 2.8 Addon Development Tutorial for Beginners (Jayanam)
Animation rig with IK and FK
Currently we have an animation rig available in the form of a Blender scene available HERE. The rig was made by Geyser and Delano762, and a tutorial on how to use it is available HERE. The rig is based on the Rigify plugin for Blender and serves as the community's modern tool to create new character animations for Oni, featuring both Forward and Inverse Kinematics – an enormous improvement over the previous FK-only method of animating.
This rig is intended to be used together with BlenderOni, a Blender addon designed as a companion tool for it – without it, the rig is extremely difficult to set up, to the point of being almost useless.
The rig has the following capabilities (which come with Rigify by default, unless otherwise noted):
- Snapping to Oni animations through bone constraints controlled by the Z location of the objects in the Pose Matching layer (added feature)
- Inverse and Forward Kinematics (IK and FK)
- Snapping between IK and FK chains
- Function to snap IK hand controller rotation to the wrist bone, integrated into rig_ui.py (added feature)
- IK joint poles for specifying limb joints (elbows and knees) should be facing
- Sliders specifying how much the neck, head and FK limbs should retain their world space rotation – that is, Neck Follow, Head Follow and FK Limb Follow
- IK foot pivoting controllers around toes and the heel
- Root bone
Tutorial for creating animation rig
If you want to create the above rig, and learn a bit about rigs, IK/FK, Rigify, Blender, bone layers, bone constraints, scripts, issues with Oni models and animations such as the rotation order being incompatible with Blender, see Creating an animation rig in Blender.
BlenderOni
BlenderOni is a Blender addon intended as an integral companion tool for the fan-made animation rig for Blender. It contains functionalities that automate a lot of operations necessary for the rig to function and be used properly. However, the vast majority of the addon's options can also be used for general Blender purposes.
For more information on BlenderOni, please check its documentation page available HERE.
Blender-specific OniSplit information
For detailed instructions on how to convert Oni assets to Blender-readable files, please check Blender-specific OniSplit information.
Oni-specific issues with Blender
Fixing texture mapping of DAE files
Replace all instances of <technique> with <technique sid="common">.
Rotation order
The previous XSI process allowed us to get to work pretty quickly: you could simply export any animation from Oni as a COLLADA file using OniSplit, then import it to XSI and it would work (mostly) without any quirks. That is not the case with Blender. If you import any Oni animation into Blender as it is, the rotations will be all wrong.
That's because Oni's rotations are stored in XYZ Euler rotation order, while Blender's XYZ is actually ZYX despite being called "XYZ"; this is because Blender reads the Euler angles from the bottom of the hierarchy rather than the top. In other words, Oni reads XYZ starting with X, while Blender starts with Z.
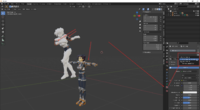
You can demonstrate this by simply switching the rotation order of the body parts from XYZ to ZYX, as shown below. The image on the left shows KONCOMcomb_p imported to Blender without any adjustments, with the rotation order set to Blender's default "XYZ", while the image on the right shows the same animation after switching the rotation order to ZYX.
| KONCOMcomb_p in Blender's XYZ | KONCOMcomb_p in ZYX |
|---|---|
|
|
Because of this, geyser implemented the -blender argument in OniSplit, which solves this problem by converting Oni assets' rotation order from XYZ to quaternions and then to ZYX, and vice versa when exporting assets from Blender to Oni. So that conversion flow looks as follows:
- From Oni to Blender:
XYZ → Quaternions → ZYX
- From Blender to Oni:
ZYX → Quaternions → XYZ
To summarize: Always use the -blender argument when you're exporting assets from Oni to Blender, otherwise you can expect the problem shown in the above screenshots.
Differing up-axis
To be expanded on later: Oni's "up" axis is Y, Blender's is Z.
Units
To be expanded on later: Oni's units are in the imperial system, not the metric one, though the 0.1-meter unit used by OniSplit is a good approximation of Oni's actual world unit of 4 inches.
Lack of textures on animated models
Currently there is no option in OniSplit for exporting animated models with textures in a way that Blender will import. While you don't need textures for animating, they are very useful, particularly in the case of Oni; the models are low-detail to a point where you can lose sense of which direction elbows and knees are facing if you don't have the textures on.
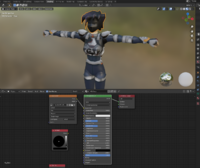
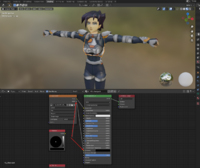
Because there is no option to export animated models with textures, the current workaround for that is to import an unanimated model with textures, then import an animated model, and either copy materials from the unanimated model to the animated one (the faster method), or set the materials on the animated model manually in the Shading tab.
| Copying materials |
|---|
Alpha transparency issue
You will also most likely need to set the Shading settings on some of the body parts of a non-animated model in order to fix alpha transparency issues (much like in XSI); specifically, you'll need to connect the Alpha parameter of the Base Color node to any parameter in Principled BSDF that will work, such as Emission Strength (this should be set up differently as that's technically incorrect, but I don't know how to do so at this moment).
| Konoko upon importing to Blender | Fixed transparency |
|---|---|
Wanted
Except for sounds, textures and text-oriented resources, Blender has the potential to be THE editor for Oni. Its powerful Python support is very useful for customization.
Additional imports/exports, XML/.oni file creation and configurations should be automated, and customization should be used to streamline workflows as much as possible. Tools in the form of addons should allow users to be artists instead of coders, speeding up development of the actual projects.
A successful modding community requires not one of these points, but all of them: documentation, tools and tutorials.
Level editor
- core geometry
- pathfinding
- "furniture" (OFGA) creation/placement
- editing of CJBO
- special gunk flag placement
- basic level shading (vertex shading)
- advanced level shading for OniX?
OFGA library
Objects that are used pretty often should be provided either by Blender Asset Browser or by a customized solution.
- Blender Asset Browser video demo: https://www.youtube.com/watch?v=gJC0y6HqyAU
BSL editor
Most events in Oni are fired using trigger volumes. There should be an editor to open the code of a trigger volume as soon as it's selected in Blender.
Also, character functions should editable when you select a character.
The editor should be context-sensitive to:
- level geometry: atmosphere, save points, win level, lose level
- objects: scripting of static and animated objects (cutscene editor)
- particle scripting
- character: after selecting a character there should be a button visible to edit the ONCC, TRBS, animations and textures (GIMP/Photoshop).
Character editor
Character library
There should be a way to place characters or character placeholders so that character collections (BINACHAR) can be saved to disk based on their positioning in the level model.
Animation editor
The core would be BlenderOni that is called as soon as a user chooses to create or edit an animation. It could be extended to edit TRAC.
Particle editor
A particle editor has been always missing in the community.
Testing and publishing support
There should be some linking to Vago and AEI for package creation and quick starting of levels for testing.
A secondary Oni installation could serve as a developer environment where only one level is present at a time. With OniX, it could be made possible to skip the menu UI and automatically load the current project.
