Restless Souls/Wishlist: Difference between revisions
Paradox-01 (talk | contribs) (swappable glowtex) |
Paradox-01 (talk | contribs) m (video #3 - optional glowtex, pickup animation binding, character sockets) |
||
| Line 526: | Line 526: | ||
====Exit the game==== | ====Exit the game==== | ||
Create two nodes in level blueprints: "input keyboard escape" and "quit game". Connect the execution slots. | Create two nodes in level blueprints: "input keyboard escape" and "quit game". Connect the execution slots. | ||
===Videos=== | |||
Those videos are merely video proofs that a certain feature can be made by us with this engine. Not more, not less. | |||
[https://youtu.be/RZSeUP-cCVA Oni UE4 experiment 1 - Main Menu, HUD, Fall damage] | |||
[https://youtu.be/y4sxRP-GrVQ Oni UE4 experiment 2 - picking up hyposprays and using them] | |||
[https://youtu.be/-AxaiojcAQU Oni UE4 experiment 3 - optional glowtex, animation binding, character sockets] | |||
:;Comment | |||
:Glowtex can be disabled if we need to. Though I think the majority of the modders wants a non-visible "hammerspace" inventroy. | |||
:The pickup animation from "Character Interaction" is too slow for Oni's fast pace. Also the animation needs tweaking so that it better interpolates to the idle anim. | |||
Revision as of 16:18, 1 January 2018
Oni 2 game
Engine
If we had a real option to create an Oni 2 with modern engine I would root for Unreal Engine 4.
It works on PC and Macs and it is free for non-commercial projects.
There's a big community, documentation and tutorials.
If the demo is going to be extended it would be better to work with original/free content from begin with, sparing us IP concerns. Old content is meant as placeholders.
It supports weapon and h2h combat. Of course Oni's unique fighting style would have be re-written. But everything else should be supported by the engine. Particle, trigger volumes, wide environments, details characters. What else could you wish for?
Features
Besides new levels, characters and story... How about new gameplay elements? Since the Daodan is an core element of the story it would be shame not to make use of it. It would add a strategical component and adds to the replay value.
Since the bio aspects would be hard to reinvent for a spiritual successor, one might more concentrate on good 'ol nanotech. "Omega days"? "Iron demons?"
Primary Daodan traits
- Healing (stopping a heavy bleeding and recovery speed)
- Power (stronger attacks, throwing or using heavy objects and enemies as weapons (e.g. using a skriker as Nunchaku with maxed out power))
- Speed (faster attacks, running, reflexes (dodging, counters))
- Adapting (mutation speed (biological computing by means of "Oni cluster" cells))
- Mechanical resistance (adaptions to pressure and kinetic damage (e.g. graphene enhanced cells))
- Physical resistance (VDG, plasma, phase stream projectors (electric isolation))
- Chemical resistance (acid, poison (lead bullets, mercury bow bullets))
- Biological resistance (screamer cells, infections by untreated wounds)
- Thermal resistance (extreme heat - fire, extreme coldness)
- Nuclear resistance (depleted uranium ammunition and surviving contaminated areas)
Basically you can "tank up" against weapons and don't need to worry about ammo.
To keep balance you could add more dangerous weapons as the game progresses.
Secondary Daodan traits
The Daodan is not almighty. It has certain weaknesses you should watch out for.
- Your Daodan abilities depend on Daodan biomass which means you can either unlock new abilities or enhance existing ones. And there's a limit to your abilities, because your cell count is limited.
- There should be one or two "ultimates" in Imago stage that depend on your evolution.
- Your number of Daodan cells depend on taken damage and recovery that happen in the last level.
- But too much damage can cause too high growth rates (temporary sudden pain and fever resulting in moments of reduced vision, shooting accuracy, "getting blocked" rate) or it simply kills you because you exceeded the maximal healing capacity of the daodan.
- Sytropin can help you in lowering growth rates. Be aware of increasing drug resistance as the game progresses.
- Reverting an existing mutation takes more "work" than establishing a new one. Basically your course of action is directed evolution.
Improved movement set and h2h
- prone mode
- sneaking at walls and through vent channels
- throw foes over obstacles
- extend h2h with Parkour elements (e.g. wall jump connectable to a flying knee)
- use pickable objects as weapons (either throwable or usable as a club)
- ledge grab (not a must-have)
- swimming (not a must-have)
Miscellaneous
- controllable drones, robots, mechs, vehicles
- dynamic lighting, wearable lights (flash lights) for dark environments
- temperature affects characters (not a must-have)
- emotions affects characters (not a must-have, rage enhances Daodan powers to a limited degree)
Oni 2 game tech demo with Unreal Engine 4

Everyone could pickup one of these points and investigate how to implement it.
If successful that person would write down a mini-tutorial here on OniGalore so others could see progress and learn from the documentation to perhaps pickup the next, somewhat more complex point.
There could be project files on a cloud drive as long as there aren't too many people involved (otherwise a SVN). New files could be uploaded into a revision folder. Users could test the changes and then update the project in the cloud.
- V - video
- T - tutorial
- D - documentation
Features the demo should include:
- two levels (to test normal level load routine and level streaming (T))
- skydome (V)
- lightning
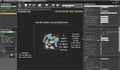
- main menu
- So far I failed to add background music. This gave rise to the idea of having an own level for the main menu where you can spawn ambient music. Muro or another character could be previewed with their current movement set and equipment. Shooting the camera would make the game quit. This will be useful when the enemy takes over this HQ AI and he needs to shut it down. "Mission failed." "Screw you!" Pressing the "V" key would allow you to go into your training room or HQ testing new moves or doing investments.
- HUD ("circular" health bar, item slots)
- background music (D) (T) (V)
- save game state
- read game state
- text pages for diary, etc.
- fbx import of old objects
- static
- pushable
- animated
- animated objects with collision box to stand on
- objects that can be thrown
- CJBO equivalents (characters, console, door, trigger (laser), trigger volume, ...)
- compass (objective)
- LSI
- FBX import and usage of old characters
- combining character parts to one model
- rigging the model
- minimum TRAC-TRAM integration I (walk cycle and idle)
- prone mode
- keyboard and mouse controls
- functional animations
- character h2h (force-sensitive) (a.k.a physical animation component)
- character h2h
- hit reaction
- minimum TRAC-TRAM integration II (combat idle, punch, kick, block, half-damage, unblockable, super)
- minimum TRAC-TRAM integration III (throws)
- minimum TRAC-TRAM integration IV (throwable objects)
- overlay animations
- aiming
- holstering
- h2h weapons
- ledge climbing
- cover
- cover (AI)
- healing by hypo and level areas
- particle (attachable to env, weap, char)
- weather (rain, snow, wind, dust, lightning)
- two weapons
- ammo type: ballistic ammo
- ammo type: energy cell
- AI
- patrol paths and pathfinding
- recreation of basic ONCC properties (incl. shooting inaccuracy)
- spawn AI
- h2h-specific animations
- startle
- stun
- knockdown
- blowup
- got hit animation
- got hit animation (CBPM-specific)
- throws mechanics
- follow me command, stop command
- alarm behavior
- CBPM-specific bullet hit behavior
- add effects via ONIE-TMBD-MTRL mini complex
- driving a truck
- BSL equivalent ("Blueprint")
- team support (easy methods to make project contributions)
Besides from what all should be tested and made, here's a groundwork tutorial: Blueprint 3rd Person Game
It touches pretty much stuff in those 4 hours: getting a character into a level, setting him up as player, the controls, animations cycles, animation blending, animation overlay and attaching physics
You could probably split this thing into three parts: learning the basics, adding stuff from the long feature list (those not already covered by the basics), and tweaking animations controls to behave like Oni 1
Practice notes
Now then if you want to try this do the following.
- For content creation you maybe want to use Blender since it is free and available for PC, Mac and Linux.
- Install Visual Studio 2017 Community (to write C++ later)
- Register at https://www.unrealengine.com/en-US/what-is-unreal-engine-4, while logged in you can download the installer from the upper right corner. (Blue button "DOWNLOAD".)
- Start Installer and download Unreal Engine 4.17.1 (It will be about 6 GB. It extracts to 17 GB.)
- Learn viewport navigation from the yellow flashing blue hat icon.
- Then continue with the videos of the 3rd Person Game tutorials.
Tutorial summary: 3rd Person Game
Incomplete notes...
It seems like there aren't scripts anymore. Blueprint is Visual scripting, you are working with visualized functions, objects, etc. It's more what you can do with the C++ code which also gets compiled.
FBX can contain data for TRBS, TRIA, TRAC, multiple TRAM, materials, textures.
- Video ?
- Blend Parameter now on the left side.
Keybinding (equivalent to key_config.txt)
Input to move binding (equivalent to StNA)
Support for Keyboard, Mouse (and inverted control), Gamepads and touch
Player camera settings editable (distance holder named "Spring Arm")
- Animations
- Animation cycles (TRAM - shortcuts)
- Transition rules (similar to those in TRAM headers <FromState>, <ToState>)
- Blend Space is an heavily enhanced version of <Interpolation>
- The animation gets adapted in length AND rotation values. When properly used, transition are nothing less than perfect.
- Video 8
- Anim Preview Editor is on the right now
- Event Graph: right-click for context menu to add missing "Try Get Pawn Owner"
- Video 12
- Character Blueprint is sort of an ONCC. They aren't exactly equal.
- It misses seeing, hearing, weapon skills and more. It has settings for jump, "air control", LOD, shadow, few CHAR events, collision box, tags, ONIE related stuff
EventGraph -> Component -> Mesh -> e.g. Get Material Index
[...]
Selected knowledge
Whenever you edited a Blueprint: compile and save file.
Videos
- Show Intro video
- Settings > Project Settings > (Project section) Movies
- Wait for Movies to Complete [x] (prevent bug from closing video automatically right after start)
- Movies Are Skippable [x]
- Add element to array, insert an MP4 video with 25 frames per second
- Bug: On Windows the mouse cursor will be shown during video playback.
An animated intro would be nice but that's unfeasible for us. Instead ingame cutscenes could be used.
- Display video in fullscreen (e.g. for Outro)
- https://www.youtube.com/watch?v=W_nSACYTIvY
Icon and Splash Screen

It's not a level splash screen. It's shown when the game starts.
Settings > Project Settings > Platforms > Windows > Splash
- Editor Splash, Game Splash
Beneath the Game Icon can be set however I couldn't spot its used location yet. Maybe it will show up later when the game gets "cooked".
Difficulty
Easy
- -20%? health for foes
Normal
Hard
- +20%? health for foes
- foe class upgrade?
Extreme
- shorter reaction times of AI ("killmequick")
- powerups on the ground can be destroyed quite easily by projectiles or heavy h2h attacks
- ammo -> blast damage and fire
- cell -> blast damage and stun effect
- hypo -> little blast damage and a cloud of healing gas
- shield -> major blast damage
- invis -> blinding
- LSI -> mission failed ?
YOLO
- Extreme mode plus when player dies he cannot reload that savegame. He has to restart at level 1.
YOLO +
- YOLO plus the games has never been played before. first play after installation. This is a secrete achievement.
Main func

Equivalent to Oni's main func can be found / created in the "Level Blueprint".
Blueprints > Open Level Bluprints
Right-click to open context menu. Search for and add node "Event BeginPlay"
At this point it's empty.
Maybe for testing or learning purposes add another node: "Play Sound 2D".
Change its Sound source to a Sound Cue you made.
Connect the nodes Event BeginPlay with Play Sound 2D.
Blueprints
You can copy-paste blueprints and share them with others in plain text.
Example of an exit function. (In the actual game use Escape key to exit.)
Begin Object Class=/Script/BlueprintGraph.K2Node_InputKey Name="K2Node_InputKey_0"
   InputKey=Escape
   NodePosX=864
   NodePosY=-832
   NodeGuid=99076AC847F4C36E70B54AA78927F135
   CustomProperties Pin (PinId=92DEBC9A43D657DB995617849A0B7927,PinName="Pressed",Direction="EGPD_Output",PinType.PinCategory="exec",PinType.PinSubCategory="",PinType.PinSubCategoryObject=None,PinType.PinSubCategoryMemberReference=(),PinType.PinValueType=(),PinType.ContainerType=None,PinType.bIsMap=False,PinType.bIsSet=False,PinType.bIsArray=False,PinType.bIsReference=False,PinType.bIsConst=False,PinType.bIsWeakPointer=False,LinkedTo=(K2Node_CallFunction_44 BC9E715842362EDD413EF8A39B14F625,),PersistentGuid=00000000000000000000000000000000,bHidden=False,bNotConnectable=False,bDefaultValueIsReadOnly=False,bDefaultValueIsIgnored=False,bAdvancedView=False,bOrphanedPin=False,)
   CustomProperties Pin (PinId=3CDB2A9D40427A0CCFDABF8F090CE41F,PinName="Released",Direction="EGPD_Output",PinType.PinCategory="exec",PinType.PinSubCategory="",PinType.PinSubCategoryObject=None,PinType.PinSubCategoryMemberReference=(),PinType.PinValueType=(),PinType.ContainerType=None,PinType.bIsMap=False,PinType.bIsSet=False,PinType.bIsArray=False,PinType.bIsReference=False,PinType.bIsConst=False,PinType.bIsWeakPointer=False,PersistentGuid=00000000000000000000000000000000,bHidden=False,bNotConnectable=False,bDefaultValueIsReadOnly=False,bDefaultValueIsIgnored=False,bAdvancedView=False,bOrphanedPin=False,)
   CustomProperties Pin (PinId=02AB461F46584F140257A5BC03E90865,PinName="Key",Direction="EGPD_Output",PinType.PinCategory="struct",PinType.PinSubCategory="",PinType.PinSubCategoryObject=ScriptStruct'/Script/InputCore.Key',PinType.PinSubCategoryMemberReference=(),PinType.PinValueType=(),PinType.ContainerType=None,PinType.bIsMap=False,PinType.bIsSet=False,PinType.bIsArray=False,PinType.bIsReference=False,PinType.bIsConst=False,PinType.bIsWeakPointer=False,PersistentGuid=00000000000000000000000000000000,bHidden=False,bNotConnectable=False,bDefaultValueIsReadOnly=False,bDefaultValueIsIgnored=False,bAdvancedView=False,bOrphanedPin=False,)
End Object
Begin Object Class=/Script/BlueprintGraph.K2Node_CallFunction Name="K2Node_CallFunction_44"
   FunctionReference=(MemberParent=Class'/Script/Engine.KismetSystemLibrary',MemberName="QuitGame")
   NodePosX=992
   NodePosY=-832
   NodeGuid=F926936F4422AC469B38B3B6EBAB12BE
   CustomProperties Pin (PinId=BC9E715842362EDD413EF8A39B14F625,PinName="execute",PinToolTip="\nExec",PinType.PinCategory="exec",PinType.PinSubCategory="",PinType.PinSubCategoryObject=None,PinType.PinSubCategoryMemberReference=(),PinType.PinValueType=(),PinType.ContainerType=None,PinType.bIsMap=False,PinType.bIsSet=False,PinType.bIsArray=False,PinType.bIsReference=False,PinType.bIsConst=False,PinType.bIsWeakPointer=False,LinkedTo=(K2Node_InputKey_0 92DEBC9A43D657DB995617849A0B7927,),PersistentGuid=00000000000000000000000000000000,bHidden=False,bNotConnectable=False,bDefaultValueIsReadOnly=False,bDefaultValueIsIgnored=False,bAdvancedView=False,bOrphanedPin=False,)
   CustomProperties Pin (PinId=308342D741456EB59283E7A1B0C7183D,PinName="then",PinToolTip="\nExec",Direction="EGPD_Output",PinType.PinCategory="exec",PinType.PinSubCategory="",PinType.PinSubCategoryObject=None,PinType.PinSubCategoryMemberReference=(),PinType.PinValueType=(),PinType.ContainerType=None,PinType.bIsMap=False,PinType.bIsSet=False,PinType.bIsArray=False,PinType.bIsReference=False,PinType.bIsConst=False,PinType.bIsWeakPointer=False,PersistentGuid=00000000000000000000000000000000,bHidden=False,bNotConnectable=False,bDefaultValueIsReadOnly=False,bDefaultValueIsIgnored=False,bAdvancedView=False,bOrphanedPin=False,)
   CustomProperties Pin (PinId=2EF7797B47E79A543E0AEAB9F7914F98,PinName="self",PinFriendlyName=NSLOCTEXT("K2Node", "Target", "Target"),PinToolTip="Target\nKismet System Library Object Reference",PinType.PinCategory="object",PinType.PinSubCategory="",PinType.PinSubCategoryObject=Class'/Script/Engine.KismetSystemLibrary',PinType.PinSubCategoryMemberReference=(),PinType.PinValueType=(),PinType.ContainerType=None,PinType.bIsMap=False,PinType.bIsSet=False,PinType.bIsArray=False,PinType.bIsReference=False,PinType.bIsConst=False,PinType.bIsWeakPointer=False,DefaultObject="/Script/Engine.Default__KismetSystemLibrary",PersistentGuid=00000000000000000000000000000000,bHidden=True,bNotConnectable=False,bDefaultValueIsReadOnly=False,bDefaultValueIsIgnored=False,bAdvancedView=False,bOrphanedPin=False,)
   CustomProperties Pin (PinId=E5668388474ABD86D0C505AE22C65ECB,PinName="WorldContextObject",PinToolTip="World Context Object\nObject Object Reference",PinType.PinCategory="object",PinType.PinSubCategory="",PinType.PinSubCategoryObject=Class'/Script/CoreUObject.Object',PinType.PinSubCategoryMemberReference=(),PinType.PinValueType=(),PinType.ContainerType=None,PinType.bIsMap=False,PinType.bIsSet=False,PinType.bIsArray=False,PinType.bIsReference=False,PinType.bIsConst=False,PinType.bIsWeakPointer=False,PersistentGuid=00000000000000000000000000000000,bHidden=True,bNotConnectable=False,bDefaultValueIsReadOnly=False,bDefaultValueIsIgnored=False,bAdvancedView=False,bOrphanedPin=False,)
   CustomProperties Pin (PinId=8E90ECF5471A7E7EA51527B95CA238F9,PinName="SpecificPlayer",PinToolTip="Specific Player\nPlayer Controller Object Reference\n\nThe specific player to quit the game. If not specified, player 0 will quit.",PinType.PinCategory="object",PinType.PinSubCategory="",PinType.PinSubCategoryObject=Class'/Script/Engine.PlayerController',PinType.PinSubCategoryMemberReference=(),PinType.PinValueType=(),PinType.ContainerType=None,PinType.bIsMap=False,PinType.bIsSet=False,PinType.bIsArray=False,PinType.bIsReference=False,PinType.bIsConst=False,PinType.bIsWeakPointer=False,PersistentGuid=00000000000000000000000000000000,bHidden=False,bNotConnectable=False,bDefaultValueIsReadOnly=False,bDefaultValueIsIgnored=False,bAdvancedView=False,bOrphanedPin=False,)
   CustomProperties Pin (PinId=FDCA728E4AFA5A2ABEA52A88B5B79FEA,PinName="QuitPreference",PinToolTip="Quit Preference\nEQuitPreference Enum",PinType.PinCategory="byte",PinType.PinSubCategory="",PinType.PinSubCategoryObject=Enum'/Script/Engine.EQuitPreference',PinType.PinSubCategoryMemberReference=(),PinType.PinValueType=(),PinType.ContainerType=None,PinType.bIsMap=False,PinType.bIsSet=False,PinType.bIsArray=False,PinType.bIsReference=False,PinType.bIsConst=False,PinType.bIsWeakPointer=False,DefaultValue="Quit",PersistentGuid=00000000000000000000000000000000,bHidden=False,bNotConnectable=False,bDefaultValueIsReadOnly=False,bDefaultValueIsIgnored=False,bAdvancedView=False,bOrphanedPin=False,)
End Object
Begin Object Class=/Script/UnrealEd.EdGraphNode_Comment Name="EdGraphNode_Comment_7"
   NodePosX=816
   NodePosY=-880
   NodeWidth=490
   NodeHeight=230
   NodeComment="Exit"
   NodeGuid=92DC2D0B492925CE0957EB865A535520
End Object
Cameras
Third Person View
Right after testing the vanilla Third Person Character template in UE you will notice that the camera can be fully moved around the player character.
In Oni the orbiting is limited. IMO this added to Oni's unique vibe. Hand-to-hand combat felt more realistic because you can't really see behind your back.

- Part I
To reproduce the same behavior you have to silent the mouse controls on some conditions.
In theory the core function would hold these parts:
- check for camera's rotation relative to the character (if rotation exceeds limits the input gets nullified)
- check for left turn mouse rotation to get out of camera's right side maximum
- check for right turn mouse rotation to get out of camera's left side maximum
In practice I tweaked the facing value so that is always below 180 degrees (e.g. -270 becomes 90). That way following code only needs the later 2 of 3 checks.
https://1drv.ms/t/s!Asn4fV_yvODigUAfQ-spWYnvi1pV
- Part II
During the BeginPlay Event you can set nodes to limit the camera pitch (up and down movement).
https://1drv.ms/t/s!Asn4fV_yvODigT8xJ35jXaxFlD35
- Part III
Oni's second unique feature of its Third Person View is the look mode. It shifts the mouse rotation control from the body to the head.
By that you can look to the side while keep running forward.
- Part IV
The limited mouse controls feel clumsy as long as the character can turn around by pressing the "walk backwards" key.
We need changes so that the character actually walks backwards and does NOT turn around.
Music
Sound files extracted with OniSplit aren't compatible, you have to convert them to 16-bit PCM wav again. Audacity works well for that.
The OSBD properties can be recreated by turning the sound into a cue and then adding BluePrint logic to it.
UE4 is unable to seamlessly loop sound parts which is a requirement for playing permutations. However, almost every Oni modder imports complete soundtracks, so it's not that much of a loss.

Example:
Import two wav files to the content browser. Right-click one to "Create Cue". Double-click that created Cue.
Add "Wave Player", "Enveloper", "Random", and "Looping" nodes.
Set a wave file for each new Wave Player.
Select all and press "C" to group them in a comment. That way you better remember what it does and can move the stuff around all at once.
Meshes
Custom collision boxes
In an 3D editor create collision objects and name it beginning with "UCX_". Save objects and collision objects together in one FBX file.
On import, uncheck "Auto Generate Collision".
Reimports

Since OniSplit outputs 3D meshes mostly as Collada (DAE) - and few as Wavefront (OBJ) - you cannot transfer objects from Oni to UE4 directly.
You either need the FBX converter or Blender to convert the Collada to FBX file format.
Also the scaling is too small. Use a factor of 10 to fix it. If we wanted to do a mass-import we would need a tool or a Blender script that alters the DAE (XML) data in advance. Also boxes do only have 5 sides. Writing a macro to fix that would be more spicy. I'm not sure if it is worth the effort to write one.
Tips and tricks:
- Reset pivot of meshes (V)
Sockets
You can't socket static meshes. Set them to be "movable".
For now each socket will need its own bool variable to keep track whether it is in use or not.
Problem: when we use this node "get overlapping actors" then also actors stored in sockets will be counted. We would need to subtract the ones from the others. To differentiate the items we could check for a new variable "UsedInSocket". If the number is higher than -1 we can subtract it from the overlapping items because we already have this one collected.
Powerups
If powerups don't spam the area they should fall to the ground after use. They should be throwable and kickable to attract the attention of foes.
Maybe there should be a weight penalty to motivate h2h combat. As less items you carry around as faster, powerful and agile you are. Reminded to Ultra saiyan vs Super saiyan?
Done stuff
- All powerup "glowtex" textures has been recreated in higher resolution.
- Pickup materials use emissive color to be actual "glowtex".
- Pickup event executes a preflight to check for valid objects. For example it will determine whether your pickup slots for hypos are all full or not. In a second step only one of the valid pickups is added to the inventory.
- Slots in the character skeleton will be used for further experiments. Pickups will be stored in belt and chest pockets. (Short one-hand weapons (e.g. pistols) are going to be holstered at the legs while rifles are put on the back.)
- Powerups in sockets are scaled down and their glowtex becomes disabled.
Possible improvements
- If powerups use the same names for their inner components (TV, glowtex plane, item mesh) then the code could maybe be simplified with an "interface blueprint" which take some inputs and gives them to all powerups that are bound to that interface. That would be useful when adding more items and weapons.
Glowtex functionality
In Powerup BP: Custom event with boolean input parameter
Other nodes:
- Set Visibility (New Visibility) (target: glowtex Plane object)
- Static Mesh Component-> AddLocalOffset
- Powerup Item -> Add local Rotation, Set World Scale 3D
Swappable Glowtex
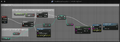
In order to indicate ammo state of weapon a dynamic material can be used.
right-click texture node to turn it into a parameterized node
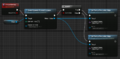
code to changed texture at runtime
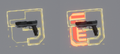
ingame result


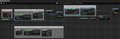
Hyposprays
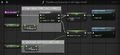
Object creation
In this attempt the glow texture was applied to a plane that is attached to the hypo mesh. Right now the actual hypo mesh is just a placeholder made of a cuboid with green ellipses. The transparency seemed to make it darker than expected so I added some input to the material's emissive color. See gallery below.
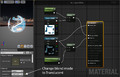
hypo material blueprint
hypo object blueprint
ingame result


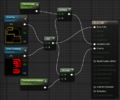
Functionality implementation
In the following there is code that let's you pickup Hyposprays (1 + 2) and use them to regain health (3 + 4).
Caution: This script is different from the others as the the pickup key press event is located in the level blueprint. Normally key press events are found in the the character blueprint. We will probably want to change that in a future version though I don't know how yet. --paradox-01 (talk) 21:03, 16 December 2017 (CET)
If you add a trigger volume to your hypospray object it will act like a new collision box. This can be used to adds some tolerance to the pickup distance. Otherwise the character has to be not just really close but to actually overlap the object.
Code: Press key to pickup hypo
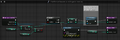
Code: Adds hypo to inventory
Code: Press key to apply hypo
Code: Increases health via hypo

Youtube: Oni UE4 Test #2 - picking up hyposprays and using them
Todo
- new hypo object mesh
- pickup animations (kneel and take, take, "roll-take")
- condition to prevent pickup with certain animations
- sounds ("cannot pickup more", "usage")
- health bar interaction (the pretty, circular one)
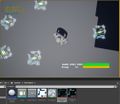
HUD
Health bar interaction
Observation from Oni 1 vanilla health bar. If base health is 200 points...
- remaining health is flashing at 60 points every 2s one time
- remaining health is flashing at 1 point every 1s two times
- critical health sound loop at 39 points (minimum sound volume)
- critical health sound loop at 1 point (max. sound volume)
- health drain animation from 200 to 1 health points takes 5s
- health gain animation speed is determined by HypoRegenerationRate in ONCC
- overpower health gain animation has an overpower sound of an approximate volume of 75% while overpower sound is played at 100% volume once overpower gain ended and drops again
Health bar recreation
There are basically two options. We use either a dynamic material (computed texture) or real textures for the health bar.
Normal maps
Can be created in Photoshop (3D) and Blender.
BSL equivalents
Level Blueprint, right-click to search for "Keyboard Event V", add that node, drag the "Pressed" slot to the backgound to create another node: "Print String". Compile. Close.
Play Level, hit "V". "Hello" appears on the screen.
Use you imagination: This could be used to toggle visibility of developer stuff. In connection with a HUD you could create the equivalent of "chr_debug_characters = 1"
Cooking the game
On Windows, run the game editor with administration rights.
Then go: File > Package Project > Windows > Windows (64-bit).
Choose an output folder.
You can now play the game.
Exit the game
Create two nodes in level blueprints: "input keyboard escape" and "quit game". Connect the execution slots.
Videos
Those videos are merely video proofs that a certain feature can be made by us with this engine. Not more, not less.
Oni UE4 experiment 1 - Main Menu, HUD, Fall damage
Oni UE4 experiment 2 - picking up hyposprays and using them
Oni UE4 experiment 3 - optional glowtex, animation binding, character sockets
- Comment
- Glowtex can be disabled if we need to. Though I think the majority of the modders wants a non-visible "hammerspace" inventroy.
- The pickup animation from "Character Interaction" is too slow for Oni's fast pace. Also the animation needs tweaking so that it better interpolates to the idle anim.