XML:Advanced tutorial: Difference between revisions
m (link fix) |
Paradox-01 (talk | contribs) mNo edit summary |
||
| (9 intermediate revisions by 2 users not shown) | |||
| Line 1: | Line 1: | ||
{{XML Home}} | |||
:: '''''New resources are also recognized in BSL.''''' | :: '''''New resources are also recognized in BSL.''''' | ||
| Line 7: | Line 8: | ||
This means that you don't have to modify everything, you can also add new content and it will work together with the old stuff. | This means that you don't have to modify everything, you can also add new content and it will work together with the old stuff. | ||
:: '''''Resources depend on each other.''''' | :: '''''Resources can depend on each other.''''' | ||
For example: | For example: | ||
| Line 13: | Line 14: | ||
"ai2_movetoflag ''CharacterNameOrID FlagID''" is a BSL command, it tells a character to move to a specific flag. This command makes use of one resource. | "ai2_movetoflag ''CharacterNameOrID FlagID''" is a BSL command, it tells a character to move to a specific flag. This command makes use of one resource. | ||
"ai2_dopath ''CharacterNameOrID PathName''" is also a BSL command, it tells a character to walk or run on a specific path formed by several flags. The path is one resource that contains actually several other resources. So it depend on them, right? | "ai2_dopath ''CharacterNameOrID PathName''" is also a BSL command, it tells a character to walk or run on a specific path formed by several flags. The path is one resource that contains actually several other resources. So it depend on them, right? While path collections are pretty simple there are also much more complex examples like ONCC and ONLV. | ||
{| class="wikitable" width="100%" | |||
|valign="top"|<pre> | |||
flag collection (BINACJBOFlag)</pre> | |||
|valign="top"|<pre> | |||
path collection (BINACJBOPatrol Path) | |||
| | |||
+-- flags</pre> | |||
|valign="top"|<pre> | |||
Oni Character Class (ONCC) | |||
| | |||
+-- animation collection (TRAC) | |||
| | | |||
| +-- animations (TRAM) | |||
| | |||
+-- texture list (TRMA) | |||
| | | |||
| +-- textures (TXMP) | |||
| | |||
+-- 3D model (TRBS) | |||
| | | |||
| +-- various 3D data types | |||
| | |||
+-- ... many more</pre> | |||
|} | |||
:: '''''I think we should try something together now.''''' | :: '''''I think we should try something together now.''''' | ||
| Line 19: | Line 45: | ||
* Let's play in window mode, then we can change to a notepad when we need to. | * Let's play in window mode, then we can change to a notepad when we need to. | ||
* We need someone | * We need someone to be our "[[wp:Guinea_pig#In_scientific_research|guinea pig]]". Let's load level 1, first savepoint, activate developer mode (try typing "x" or "thedayismine"). | ||
:: See if you have a QWERT<u>Y</u> keyboard. ~ key will open the developer mode for you. Or is it a QWERT<u>Z</u> keyboard? Then try ^ key. | :: See if you have a QWERT<u>Y</u> keyboard. ~ key will open the developer mode for you. Or is it a QWERT<u>Z</u> keyboard? Then try ^ key. | ||
:: If you cannot find the right key you can also change your key_config.txt in | :: If you cannot find the right key you can also change your key_config.txt in the folder with the game application. For example: "bind divide to console" (Devide key from numpad.) (See [[Customizing/Binding|here]] for other possible keys, fkeys might not work as console unlocker.) | ||
:: Some resolutions hides the command line, try then playing at 800x600 or 640x480. (You can change that in Oni's option menu.) | :: Some resolutions hides the command line, try then playing at 800x600 or 640x480. (You can change that in Oni's option menu.) | ||
| Line 99: | Line 125: | ||
</PATR> | </PATR> | ||
* Convert it back to .oni format. | * Convert it back to .oni format. | ||
* The modified "BINACJBOFlag.oni" and "BINACJBOPatrol Path.oni" are put into a [[ | * The modified "BINACJBOFlag.oni" and "BINACJBOPatrol Path.oni" are put into a [[XML|package]] now. Reinstall with this package. | ||
* Are we done? Almost. Still a BSL file needs to be written. Let's kick out all BSL files from '''" | * Are we done? Almost. Still a BSL file needs to be written. Let's backup and then kick out all BSL files from '''"GameDataFolder\IGMD\EnvWarehouse"''' and insert only this as BSL file. (It's a txt file, suffix changed to bsl.) Be sure to do that in AE's directory, not vanilla's one. Load level 1 and do a kick to start the test. | ||
[[Image:XML_advanced_tutorial.png|400px|right|thumb]] | |||
func main | func main | ||
| Line 117: | Line 141: | ||
ai2_spawn A_t48 | ai2_spawn A_t48 | ||
chr_changeteam A_t48 TCTF | chr_changeteam A_t48 TCTF | ||
chr_wait_animtype 0 kick | |||
chr_wait_animtype 0 kick | |||
### Do a kick. Engine will continue with following lines. | ### Do a kick. Engine will continue with following lines. | ||
dmsg "[r.Hey man, try new path now.]" | dmsg "[r.Hey man, try new path now.]" | ||
'''ai2_dopath A_t48 patrol_63''' | '''ai2_dopath A_t48 patrol_63''' | ||
Latest revision as of 21:07, 7 May 2022
- New resources are also recognized in BSL.
XML modding can be used to extend your possibilities in BSL.
Animations, characters, flags, functions from binaries (CONS, CHAR, etc.), lasers, sounds, text pages, trigger volumes, turrets, weapons, etc., they all are recognized by their name or ID in BSL.
This means that you don't have to modify everything, you can also add new content and it will work together with the old stuff.
- Resources can depend on each other.
For example:
"ai2_movetoflag CharacterNameOrID FlagID" is a BSL command, it tells a character to move to a specific flag. This command makes use of one resource.
"ai2_dopath CharacterNameOrID PathName" is also a BSL command, it tells a character to walk or run on a specific path formed by several flags. The path is one resource that contains actually several other resources. So it depend on them, right? While path collections are pretty simple there are also much more complex examples like ONCC and ONLV.
flag collection (BINACJBOFlag) |
path collection (BINACJBOPatrol Path) | +-- flags |
Oni Character Class (ONCC) | +-- animation collection (TRAC) | | | +-- animations (TRAM) | +-- texture list (TRMA) | | | +-- textures (TXMP) | +-- 3D model (TRBS) | | | +-- various 3D data types | +-- ... many more |
- I think we should try something together now.
- Let's play in window mode, then we can change to a notepad when we need to.
- We need someone to be our "guinea pig". Let's load level 1, first savepoint, activate developer mode (try typing "x" or "thedayismine").
- See if you have a QWERTY keyboard. ~ key will open the developer mode for you. Or is it a QWERTZ keyboard? Then try ^ key.
- If you cannot find the right key you can also change your key_config.txt in the folder with the game application. For example: "bind divide to console" (Devide key from numpad.) (See here for other possible keys, fkeys might not work as console unlocker.)
- Some resolutions hides the command line, try then playing at 800x600 or 640x480. (You can change that in Oni's option menu.)
- Now let's type "ai2_shownames = 1". Aha, his name is "A_t48". Let's remember that later. Key F6 will kill him. Now we won't get interrupted by him ...
- We need new flags. "chr_debug_characters = 1" displays player character's current position. That can be used to set them up.
- We goto three points. First, beneath the edge (-600 0 -640). Second, to the always closed door (-650 0 -750). Third, at the opposite side is a electro thingy (-650 0 -475).
- Now our XML work begins. We need to extract "BINACJBOFlag.oni" and "BINACJBOPatrol Path.oni" from level1_Final folder. Use "BINACJBOPatrol*.oni" when you can't extract the Patrol Path file. (* replaces everything what comes after it.)
- At file's end we see. "<FlagId>7056</FlagId>" So 7056 is very probably the last flag.
- Now we copy a block three times and insert our new data.
       <FLAG Id="11568">
           <Header>
               <Flags></Flags>
               <Position>-600 0 -640</Position>
               <Rotation>0 200.5907 0</Rotation>
           </Header>
           <OSD>
               <Color>255 255 0</Color>
               <Prefix>17228</Prefix>
               <FlagId>7057</FlagId>
               <Notes>under the edge</Notes>
           </OSD>
       </FLAG>
       <FLAG Id="11568">
           <Header>
               <Flags></Flags>
               <Position>-650 0 -750</Position>
               <Rotation>0 200.5907 0</Rotation>
           </Header>
           <OSD>
               <Color>255 255 0</Color>
               <Prefix>17228</Prefix>
               <FlagId>7058</FlagId>
               <Notes>closed door</Notes>
           </OSD>
       </FLAG>
       <FLAG Id="11568">
           <Header>
               <Flags></Flags>
               <Position>-650 0 -475</Position>
               <Rotation>0 200.5907 0</Rotation>
           </Header>
           <OSD>
               <Color>255 255 0</Color>
               <Prefix>17228</Prefix>
               <FlagId>7059</FlagId>
               <Notes>electro thingy</Notes>
           </OSD>
       </FLAG>
- Let's save flag file, convert it back into .oni formate and continueing with the patrol path file. Documentation can be found here. (XML basic tutorial page has an overview whether docus are available or not.)
       <PATR Id="11569">
           <Header>
               <Flags></Flags>
               <Position>80.96647 15.1689625 -536.0079</Position>
               <Rotation>0 0 0</Rotation>
           </Header>
           <OSD>
               <Name>patrol_63</Name>
               <PatrolId>63</PatrolId>
               <ReturnToNearest>1</ReturnToNearest>
               <Points>
                   <Loop>
                       <MovementMode Mode="Run" />
                       <MoveToFlag FlagId="7057" />
                       <MoveToFlag FlagId="7058" />
                       <MoveToFlag FlagId="7059" />
                   </Loop>
               </Points>
           </OSD>
       </PATR>
- Convert it back to .oni format.
- The modified "BINACJBOFlag.oni" and "BINACJBOPatrol Path.oni" are put into a package now. Reinstall with this package.
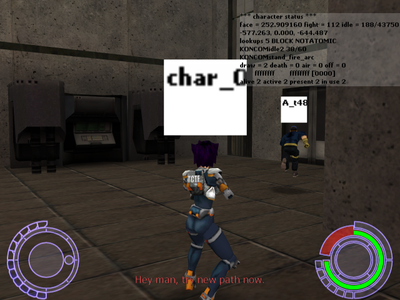
- Are we done? Almost. Still a BSL file needs to be written. Let's backup and then kick out all BSL files from "GameDataFolder\IGMD\EnvWarehouse" and insert only this as BSL file. (It's a txt file, suffix changed to bsl.) Be sure to do that in AE's directory, not vanilla's one. Load level 1 and do a kick to start the test.
func main
{
	chr_location 0 -577 0 -640
	ai2_shownames = 1
	chr_debug_characters = 1
	ai2_spawn A_t48
	chr_changeteam A_t48 TCTF

	chr_wait_animtype 0 kick
	### Do a kick. Engine will continue with following lines.

	dmsg "[r.Hey man, try new path now.]"
	ai2_dopath A_t48 patrol_63
}

