Talk:Restless Souls/Wishlist: Difference between revisions
m (→Tutorials for UE4: Added a couple more) |
m (link fix, though the page has been removed anyway) |
||
| Line 72: | Line 72: | ||
Make Human - Stand alone program (free) - http://www.makehuman.org/ | Make Human - Stand alone program (free) - http://www.makehuman.org/ | ||
ManuelBastioniLAB - Addon for Blender (free) - http://www.manuelbastioni.com/index. | ManuelBastioniLAB - Addon for Blender (free) - http://www.manuelbastioni.com/index.html | ||
Adobe Fuse 1.3 - Available in Steam (free) - http://store.steampowered.com/app/257400/Fuse/ | Adobe Fuse 1.3 - Available in Steam (free) - http://store.steampowered.com/app/257400/Fuse/ | ||
Revision as of 15:24, 21 July 2020
Discussions for WIPs?
There's no page yet for work-in-progress stuff.
Health bar
Oni's health bar is imho almost iconic to the game. So I would like to keep that radial shape.
Over here is a whole list of other characteristics we might want to re-create.
We can get the basic idea of a radial health bar from this one video: https://www.youtube.com/watch?v=N1XDatYlxhc
For the other characteristics we can learn from this one.
As known through XML:ONGS Oni's health bar uses multiple color zones. The videos show that UE4's lerp node is only used with two colors.
That means we will have to set up multiple conditions for those linear interpolations - or "lerp".
To be moved to the actual page(s?)
Naming
I guess technical material and link collection shouldn't be longer on my Wishlist. That project would be better to have its own page. Right?
What would be a good name for that project and its main page?
"Unreal Oni" maybe?
If the project fails we can half ironically say it was unreal indeed.
If it is a tech demo it would emphasize that it is made by UE. paradox-01 (talk) 18:55, 5 November 2017 (CET)
As for the actual game it would be still good enough as working title. So, it's quite fitting due to the ambiguity.
Tutorials for UE4
- Unreal Engine 4 Community Tutorials: https://wiki.unrealengine.com/Category:Tutorials
- Various Tutorials by Tommy Tran: https://www.raywenderlich.com/u/TommyTran
- Skeleton assets
- Skeleton Assets: Overview: https://www.youtube.com/watch?v=FDbpHamn2eY
- Importing, Sharing Skeletons & Anims: https://www.youtube.com/watch?v=JkcJ5bjGPsg
- Skeleton Assets: Anim Retargeting Different Skeletons: https://www.youtube.com/watch?v=xy9aLbZLdeA
- Unreal Engine 4 Full Character Creation
- The video is unpolished and awkward at times. But it shows how to create a new character, import to Blender, set up the bones, then import to UE4 and finally how to create animations within UE4. https://www.youtube.com/watch?v=oiwJIlQjCrU
- Make Human model to UE4
- Create model: https://www.youtube.com/watch?v=KH5dmggnlXo
- Export Make Human character into Mixamo for animations: http://www.codegeek.io/20170409-animate-makehuman-character-in-mixamo/
- import Mixamo character into UE4 https://www.youtube.com/watch?v=vgo4jnM0NyY
- Material Creation
- Beginners Tutorial: https://www.youtube.com/watch?v=-B9k7WwHexQ
- Sketchup to Unreal Engine playlist
- Exporting principals, methods, UV mapping: https://www.youtube.com/channel/UC3OtQyANP2KwPZ0ZERzPRAQ
Character Creation
Programs to create custom characters
Make Human - Stand alone program (free) - http://www.makehuman.org/
ManuelBastioniLAB - Addon for Blender (free) - http://www.manuelbastioni.com/index.html
Adobe Fuse 1.3 - Available in Steam (free) - http://store.steampowered.com/app/257400/Fuse/
Adobe Fuse CC Beta - Adobe Creative Cloud (subscription) - http://www.adobe.com/products/fuse.html
Auto Rigging of models
Mixamo - Upload your character model for rigging and adding animations. Also has limited amount of character models (free) - https://www.mixamo.com
Miscellaneous
Comparison of bone names between UE4 and Oni
- Root:
- Pelvis: pelvis
- spine_01: mid
- spine_02: chest
- spine_03:
- clavicle_l: left_shoulder
- UpperArm_L: left_biceps
- lowerarm_l: left_wrist
- Hand_L: left_handfist
- clavicle_r : right_shoulder
- UpperArm_R: right_biceps
- lowerarm_r: right_wrist
- Hand_R: right_handfist
- neck_01: neck
- head: head
- Thigh_L: left_thigh
- calf_l: left_calf
- Foot_L: left_foot
- Thigh_R: right_thigh
- calf_r: right_calf
- Foot_R: right_foot
Convert ONCC to UE4 Model Workflow (WIP)
1) Extract ONCC with Vago, option standing pose. (note s10k has to update Vago for this option)
2) To prepare the model, the following changes should be done. First of all open the dae in text editor. Search for <unit meter="0.1" name="decimeter" /> and change it <unit meter="10" name="decameter" />, this will set the model to the proper scale for UE4. To change the model into a T-pose, search for <node id="right_biceps">, then in the tag <rotate sid="rotY">, change the value from -90.000000 to 0.000000. Next search for <node id="left_biceps">, then in the tag <rotate sid="rotY"> change the value from 90.000000 to 0.000000. Finally, the pelvis height can be changed. Search for <node id="pelvis"> <translate sid="pos">0.000000 0.000000 0.000000</translate>. The second value should be changed to around 9 for female models and 10 to 11 for male models. For example, Konoko would be <translate sid="pos">0.000000 9.200000 0.000000</translate>. You can determine the exact height, by opening the dae in a 3D program and adjust the height of the pelvis o that the feet are level with the ground. (Note: Will need further study on adjusting the pelvis height to see if there are any negative consequences)
3) Use the program Autodesk FBX Converter 2013 to convert the dae into FBX. Use the option "Embed media", Save mode "Binary".
4) Go to website www.mixamo.com and login with your Adobe ID. Upload your character. In the Auto_Rigger page, follow the instructions and in the dropdown menu for Skeleton LOD select No Fingers (25). Once you are satisfied with the rigging, select the Animations Tab and search for T Pose and apply it to your model. Finally, download the model with the settings Format: Collada(.dae), Skin: With Skin, Frames per Second: 30, Keyframe Reduction: none. Note: If you want to download other animations, such as run, jump, flip, etc, choose "Without Skin" for the Skin option, then you will only get the animation.
5) To add a root bone to the Mixamo rig, download the Blender Plugin from https://github.com/enziop/mixamo_converter and follow the instructions. The scale can be set to 1. (Note: Make sure to select a input folder since this is a batch conversion. A file will result in errors.)
6) After the file has been converted to an fbx file, once again use Autodesk FBX Converter 2013 to convert the fbx to dae. Open the dae file and search for "file:///path_to/textures" and delete "file:///path_to/" leaving "textures/texture_name" Do this for all occurances. Next convert the dae back to fbx format. This step will allow UE4 to find the textures when importing the file.
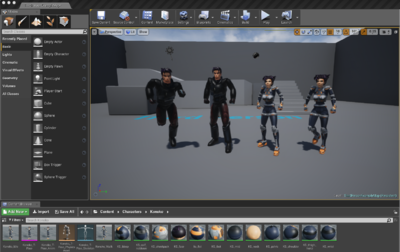
7) Useful video tutorial for Adding root bone and importing the file into UE4: https://www.youtube.com/watch?v=z97w4vrm8Eo (Note: Make sure the textures directory and fbx file are in the same directory before importing into UE. Slight change to the video's instruction. Uncheck the import animations and check the checkboxes for Material and Texture). If step 6 was done correctly, all the textures should be imported and converted to a material and applied to the model.
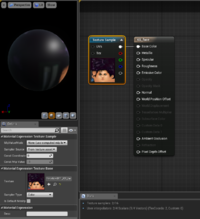
In case the textures are not installed: Once the model has been imported into UE4, you will need to assign the textures to the Materials. First of all import the ONCC textures into UE4 project. Double click on Material, right click and Add Texture Sample. Then in the Material Expression section, select texture that matches the name of material. Save Material.
7) Video on how to retarget the UE4 animations to ONCC model https://www.youtube.com/watch?v=xy9aLbZLdeA Set base pose of UE4 skeleton to T-Pose: https://www.youtube.com/watch?v=D8nH2Yo9PT8 -- EdT
Got stuck on point 7. Still have to get the T-pose working and check if I got the retargeting right. -- paradox-01 (talk) 15:40, 28 December 2017 (CET)
Just for the protocol: trying to fix the broken texture links and material nodes within the blender fbx resulted (after an additional fbx -> dae -> fbx conversion) in the destruction of the pose. So repairing the character in plain text in not an option. So we can only repair the scaling in the original dae as you pointed out Ed.

